Chapter 1
Introducing ShopPOS
Point of sale for grocery and general stores, cosmetics, garments and mini-marts.
Nexvora ShopPOS is for billing at the counter, keeping stock correct, managing customer credit (udhaar) and showing the owner each day's sales and profit. It runs on your shop's own PC, so selling continues when the internet is down, and your data never leaves the shop.
How it works
(HTTPS)
In a small shop the server PC can also be the till. Add as many tills as you like — the license is for the shop (the server), not for each till.
Two parts
POS (counter screen)
The cashier's work: scan, sell, take payment, print, udhaar, returns, shifts. Built for speed with the keyboard (F-keys); mouse and touch work too.
Owner app
For the owner and managers: products, purchases, stock, suppliers, customers, reports, staff, settings, license. Open POS at the top switches to the counter screen.
Who can do what
| Task | Owner | Manager | Cashier |
|---|---|---|---|
| Sell, print receipts, credit sales, collections | ✓ | ✓ | ✓ |
| Discount above the limit, void, approve returns | ✓ | ✓ | With a manager's approval |
| Products, purchases, stock, suppliers, customers | ✓ | ✓ | — |
| See cost and profit, reports | ✓ | ✓ | — |
| Staff, Settings, Audit Log, License | ✓ | — | — |
| See other people's shifts and sales | ✓ | ✓ | Own only |
Chapter 2
Installation and tills
About 5 minutes on the server. Usually done by a Nexvora technician.
What you need
| Item | Details |
|---|---|
| Shop server | Windows 10/11 Pro (64-bit), 8 GB RAM, SSD recommended. On a UPS if possible. |
| Fixed IP address | Reserve this PC's IP in the router (DHCP reservation). The certificate is made for this name and IP. |
| SQL Server 2022 Express | Free. Basic install, instance name SQLEXPRESS. If it is missing, setup says so and opens the download page. |
| ShopPOS-Setup.exe | .NET and Node.js are included — nothing else to install. |
| Tills | Any PC, laptop or tablet with Chrome or Edge on the same network. |
Installing on the server
- Run
ShopPOS-Setup-0.3.35.exeon the server (Windows asks for Administrator permission). - The wizard asks for: the license agreement, the shop name (printed on receipts), the owner's username and password (at least 8 characters — keep it safe), and the backup folder (default
C:\ShopPosBackups). - If a receipt printer is connected to this PC, leave “Install the ShopPOS Print Agent on this PC” ticked (Chapter 7).
- Install → the last step (“Setting up the ShopPOS service…”) takes a minute or two → Finish opens ShopPOS in the browser and adds a ShopPOS shortcut to the desktop.
ShopPOS now runs in the background as a Windows service: it starts by itself after a restart, and Windows restarts it if it ever stops. A nightly backup at 23:30 and a monthly backup check (restore drill) on the 1st are scheduled too.
https://SHOP-PC:8443/. The desktop shortcut opens the right address.On each till PC (once)
- Copy
C:\ShopPos\ShopPOS-certificate.cerfrom the server, for example on a USB stick. - On the till, double-click the file → Install Certificate → Local Machine → Place all certificates in the following store → Trusted Root Certification Authorities. (Android tablet: Settings → Security → Encryption & credentials → Install a certificate → CA certificate.)
- Open
https://SHOP-PC/(or the server's IP) in Chrome or Edge — there should be no warning. Bookmark it or make it the start page. - Plug in the barcode scanner. For a receipt printer, see Chapter 7.
First sign-in
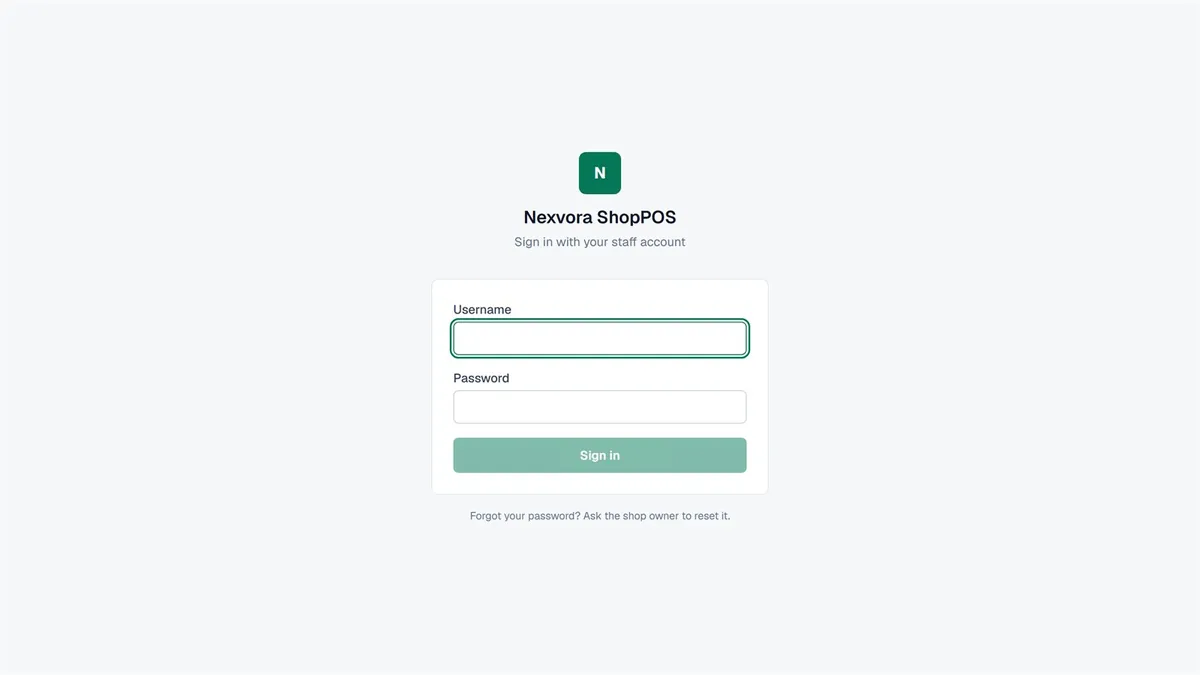
- Sign in with the owner's username and password, then choose your own password with Change password at the top.
- After 5 wrong passwords the account is locked for 15 minutes.
- The owner's first sign-in opens the Setup wizard (next chapter).
Chapter 3
Day one: setting up the shop
Done once. Everything can be changed later in Settings and on each page.
3.1 Setup wizard — three steps
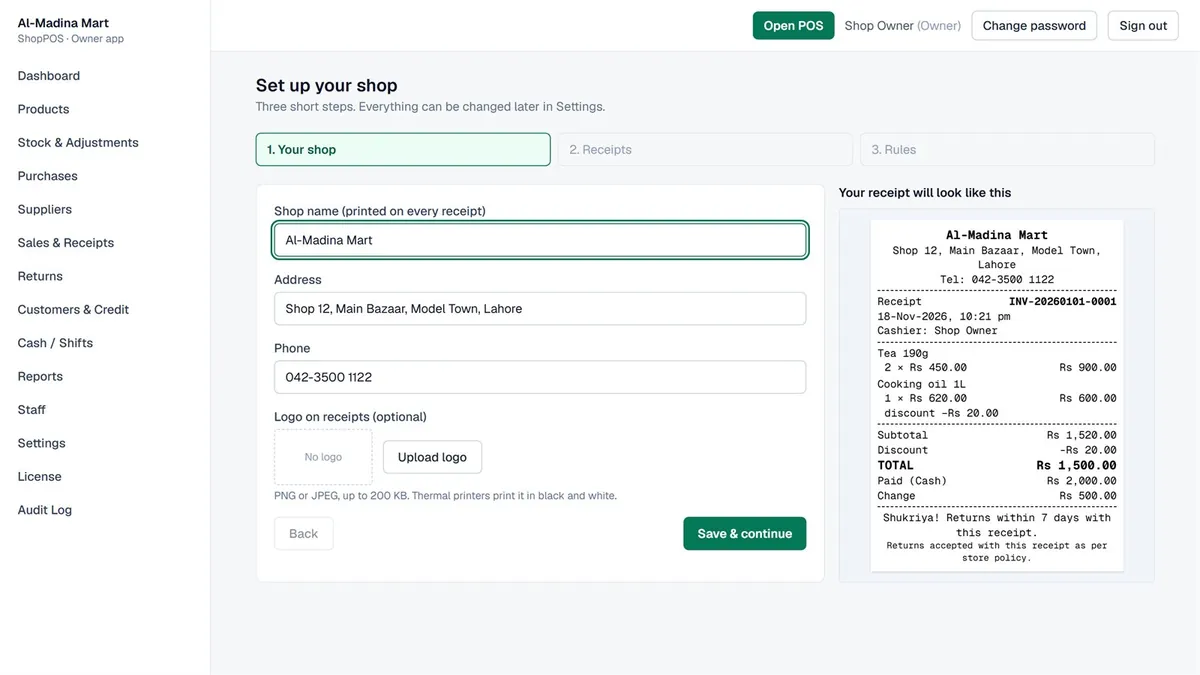
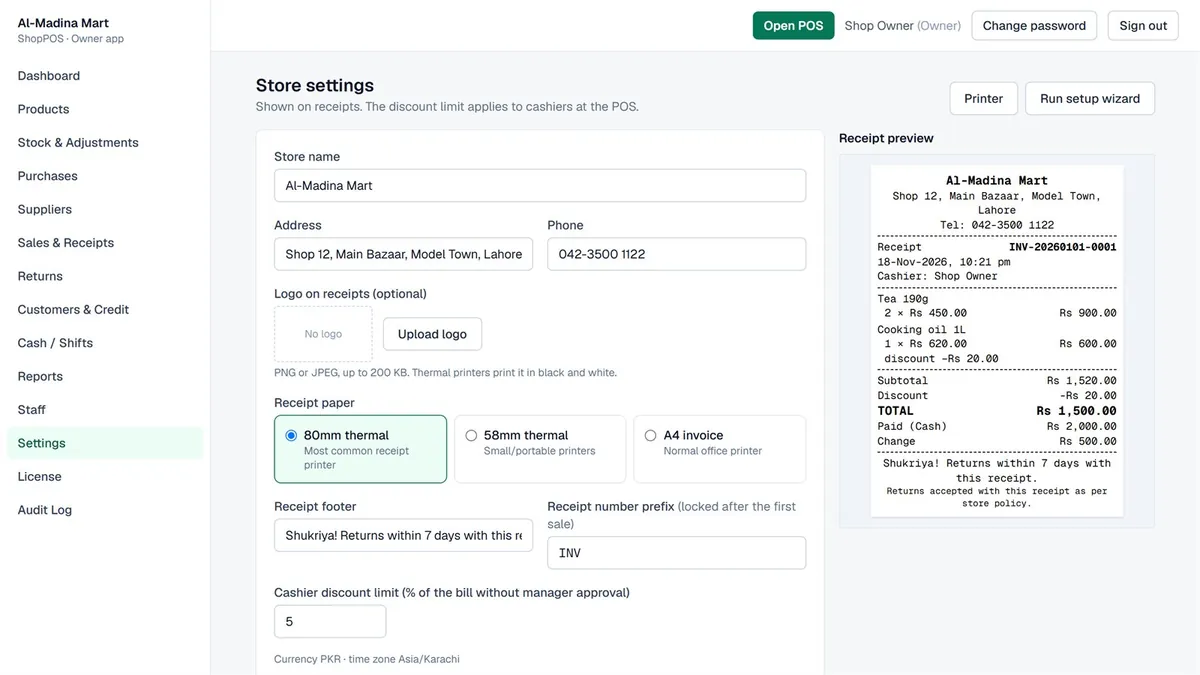
- Your shop — name, address, phone and logo (PNG/JPEG up to 200 KB; thermal printers print it in black and white).
- Receipts — paper: 80mm thermal, 58mm thermal or A4 invoice; the receipt number prefix (such as
INV— fixed after the first sale); the footer line (such as your return policy). - Rules — how much discount a cashier may give alone (for example 5%). Anything above needs a manager or the owner.
3.2 Staff
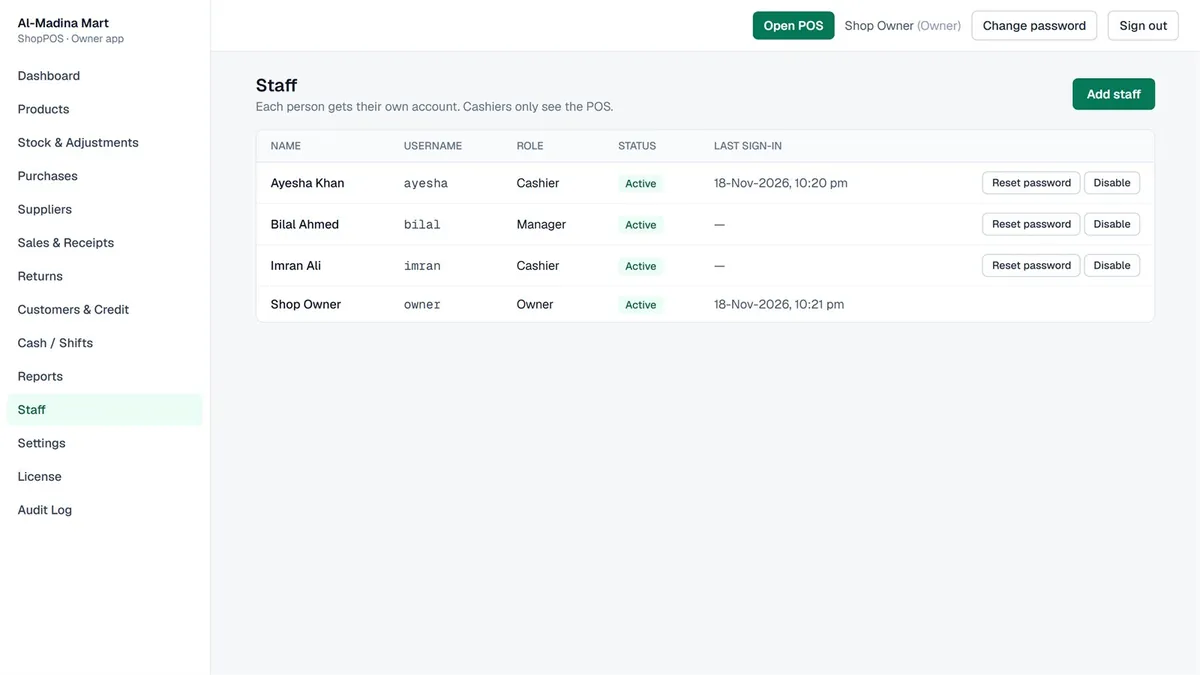
- Add staff → name, username, starting password, role: Cashier — POS only or Manager — inventory, purchases, reports. (There is one owner — the account created at installation.)
- Someone leaves: Disable — all their open sessions end at once; their history is kept.
- Forgotten password: Reset password. They then pick their own with Change password.
3.3 Products
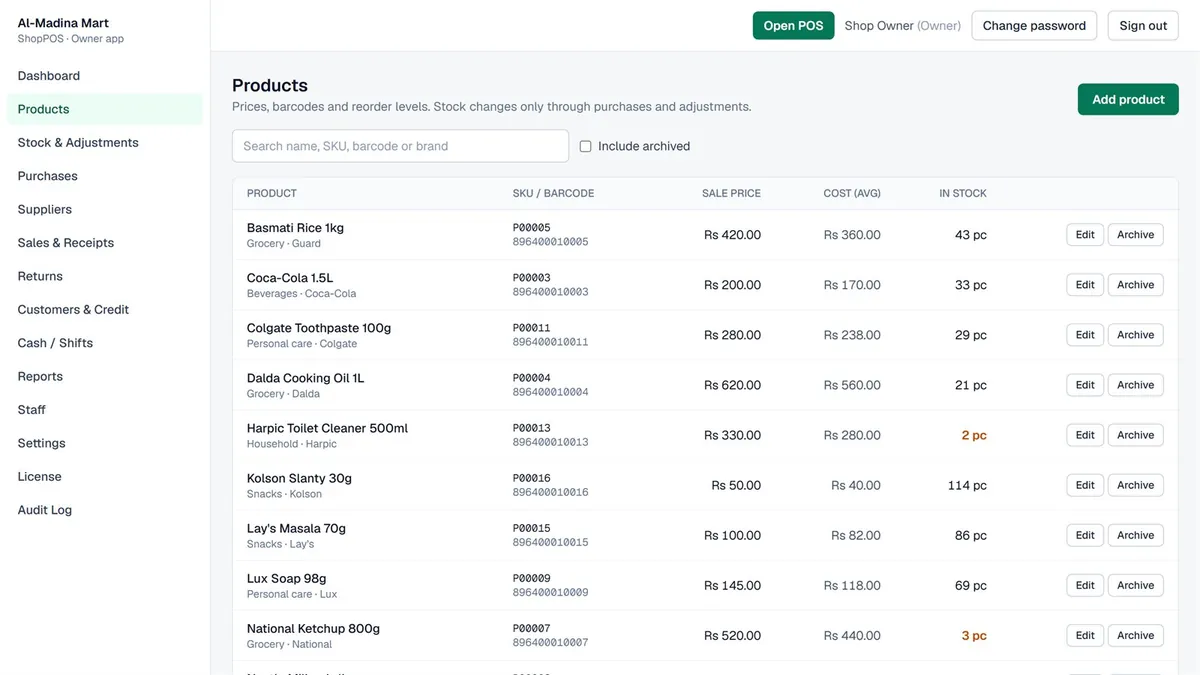
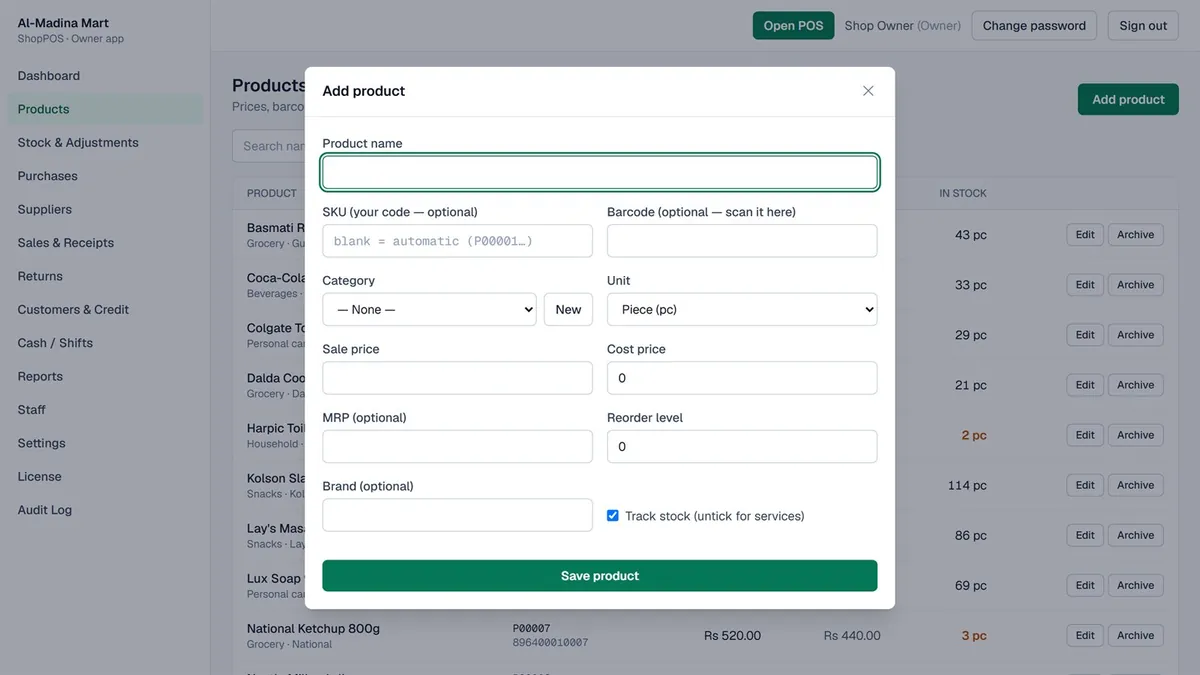
- Product name and Sale price are required. Leave SKU blank and one is made for you (
P00001,P00002…). - Barcode: put the cursor in the box and scan the product. No barcode (loose goods)? Leave it blank — it sells by name or from the item list.
- Category (create one with New), Unit, Brand, MRP, Reorder level (the dashboard warns when stock falls below it).
- Don't enter Cost price here — it comes from purchases (average cost).
- To remove a product use Archive (old receipts keep its name); bring it back with Include archived → Restore.
3.4 Opening stock and purchases
Two ways — both keep stock and cost correct:
Opening (goods already in the shop)
Stock & Adjustments → Opening next to the product → count and cost.
Purchase (new goods arrive)
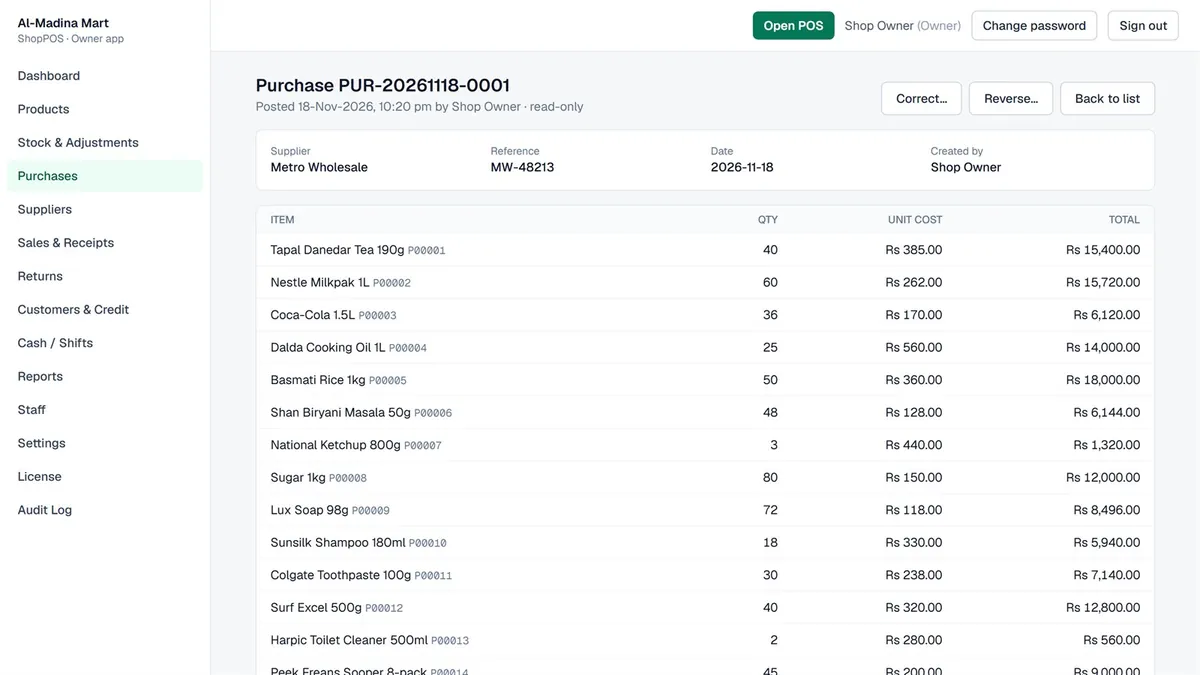
Purchases → New purchase → supplier, bill number, items, quantity and cost → Save draft → check it → Post.
3.5 Suppliers and customers
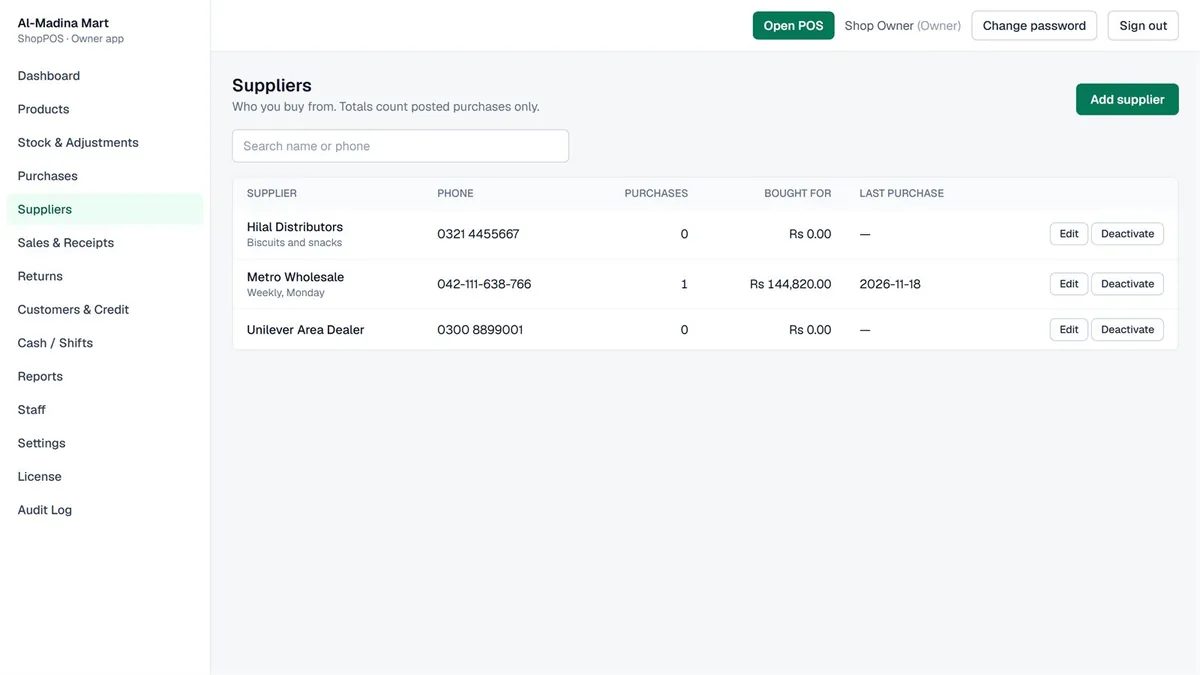
- Suppliers → Add supplier: name, phone, notes. A supplier you no longer use: Deactivate (history is kept).
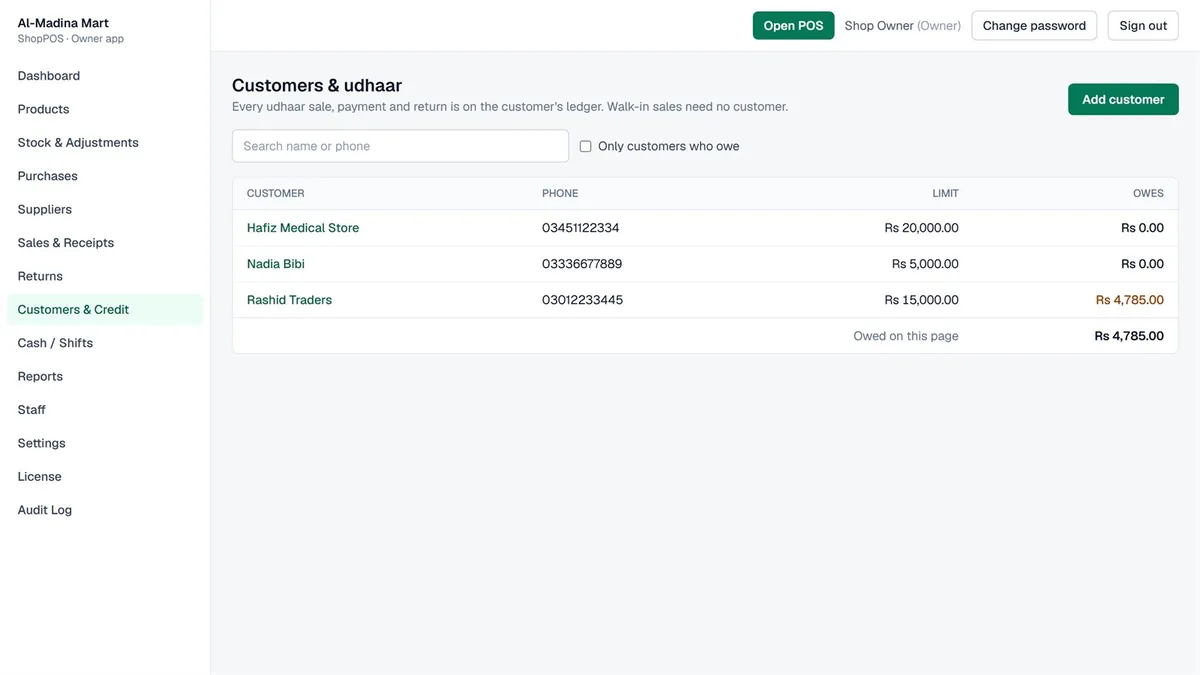
- Customers & Credit → Add customer: name, phone and credit limit. Walk-in customers need no account. Only the owner or a manager creates customers.
Chapter 4
POS: selling at the counter
For cashiers. Each button shows its keyboard key.
4.1 Starting the day — opening a shift
- Sign in with your own username and password. The first time, set your own password with Change password.
- Open your shift appears: count the cash in the drawer, enter it in Opening cash in drawer → Open shift. You cannot sell without an open shift.
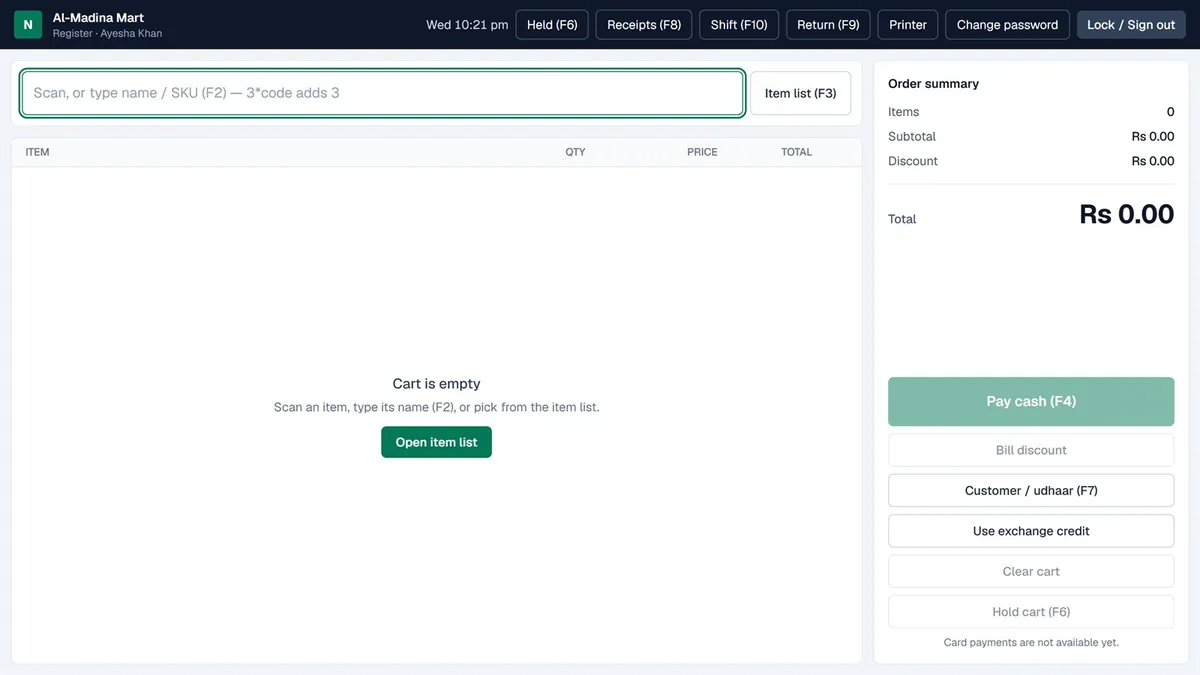
4.2 Adding items
With a scanner
- Scan the item — it goes into the cart.
- Scan the same item again = quantity +1, not a new line.
- Scan as fast as you like; nothing is missed. Scans reach the search box even when the cursor is elsewhere.
Without a scanner
- F2 → type a name or SKU, a list appears → ↑↓ and Enter, or click.
- F3 Item list: category tabs and large tiles, one more per tap.
- Several at once: type or scan with
3*in front, such as3*8964000123456.
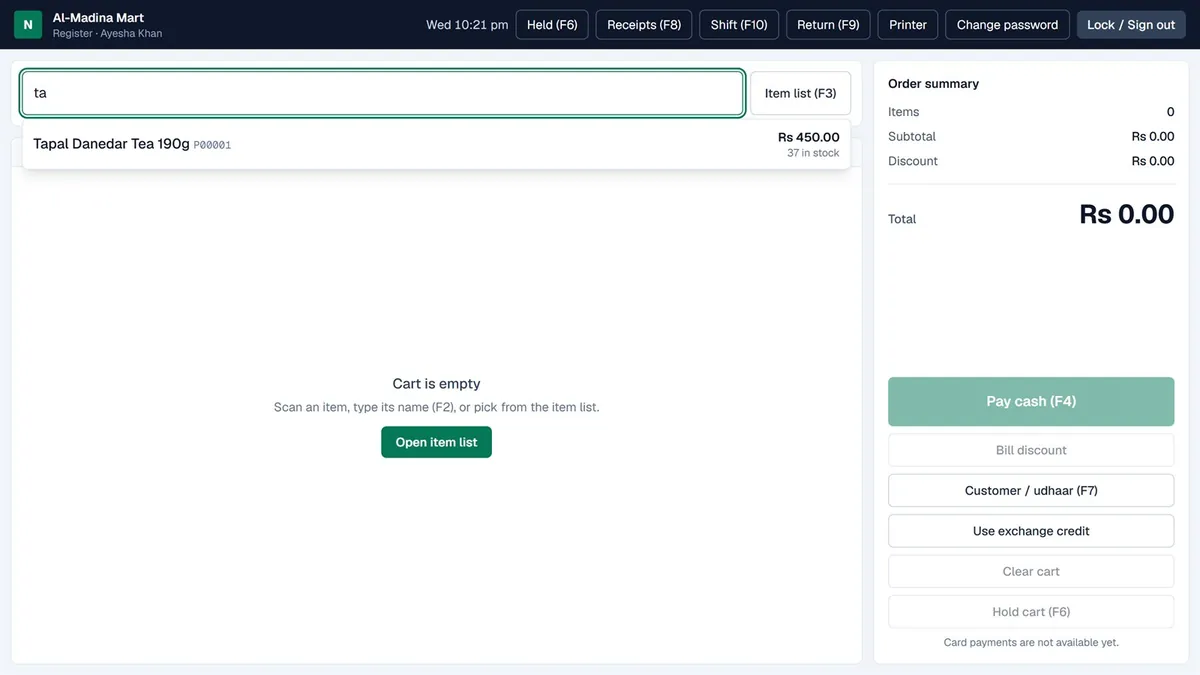
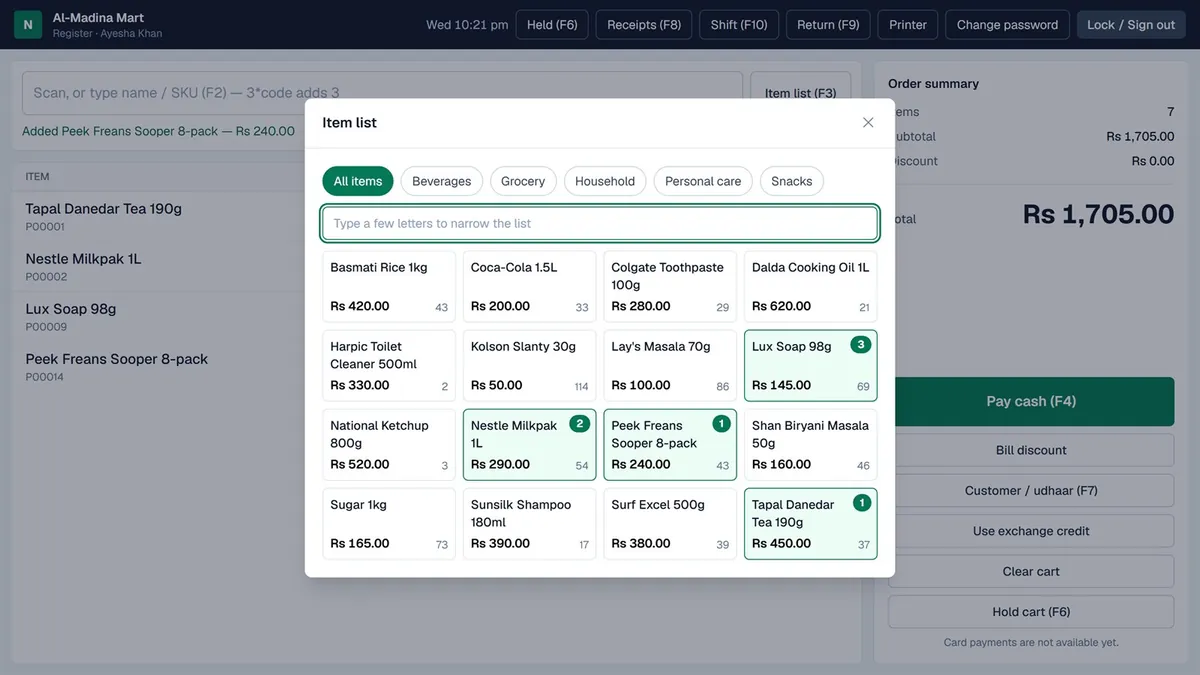
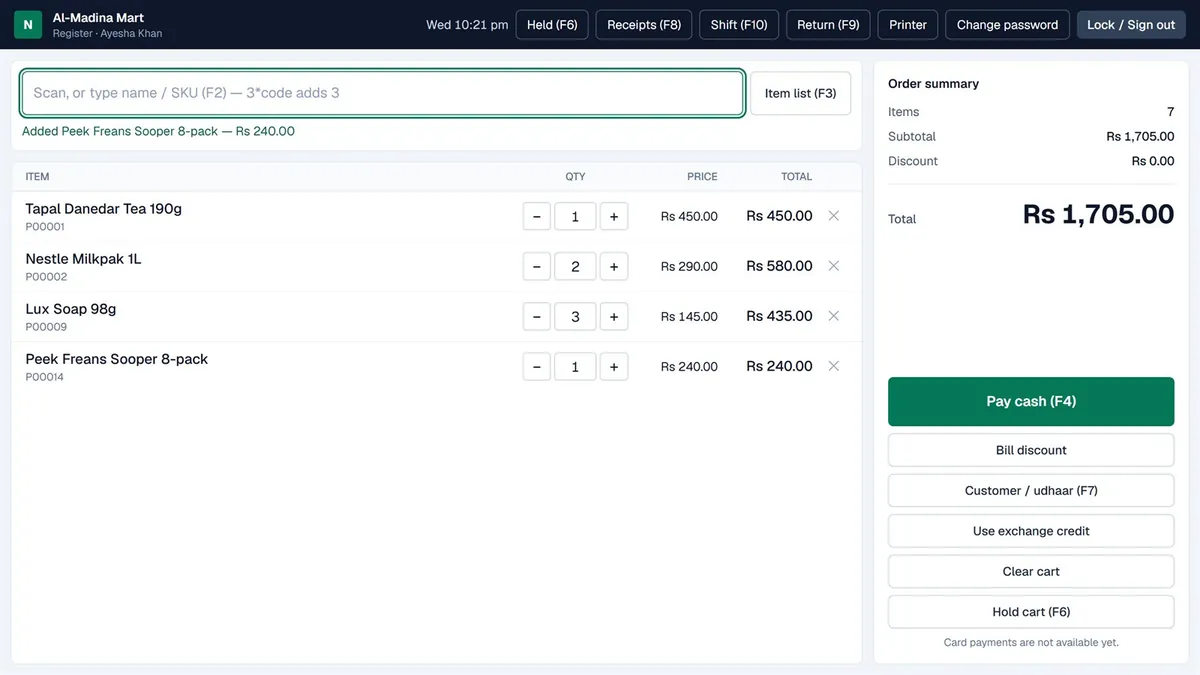
4.3 Discounts
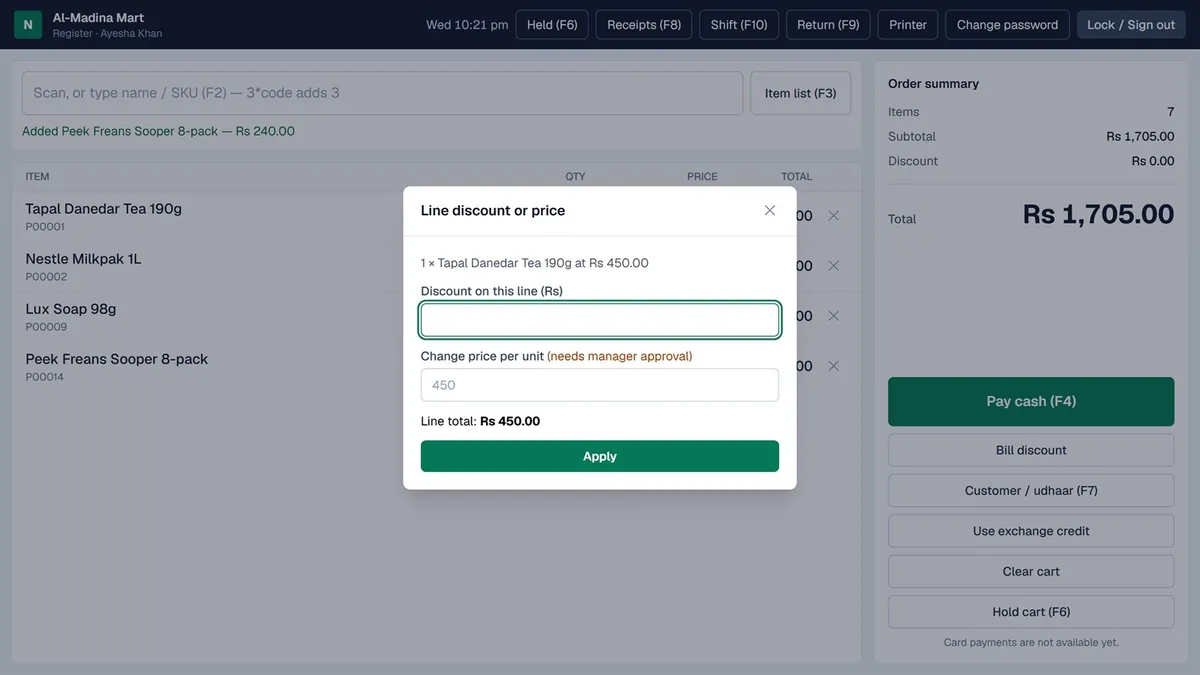
- On one item: click the item's name in the cart → amount or new price → reason.
- On the whole bill: Bill discount → amount → reason.
- A cashier may give up to the owner's limit (for example 5%). Above it, Manager approval appears at payment — the manager types their own username and password and presses Approve & complete sale. Every discount is recorded.
4.4 Payment — F4 Pay cash
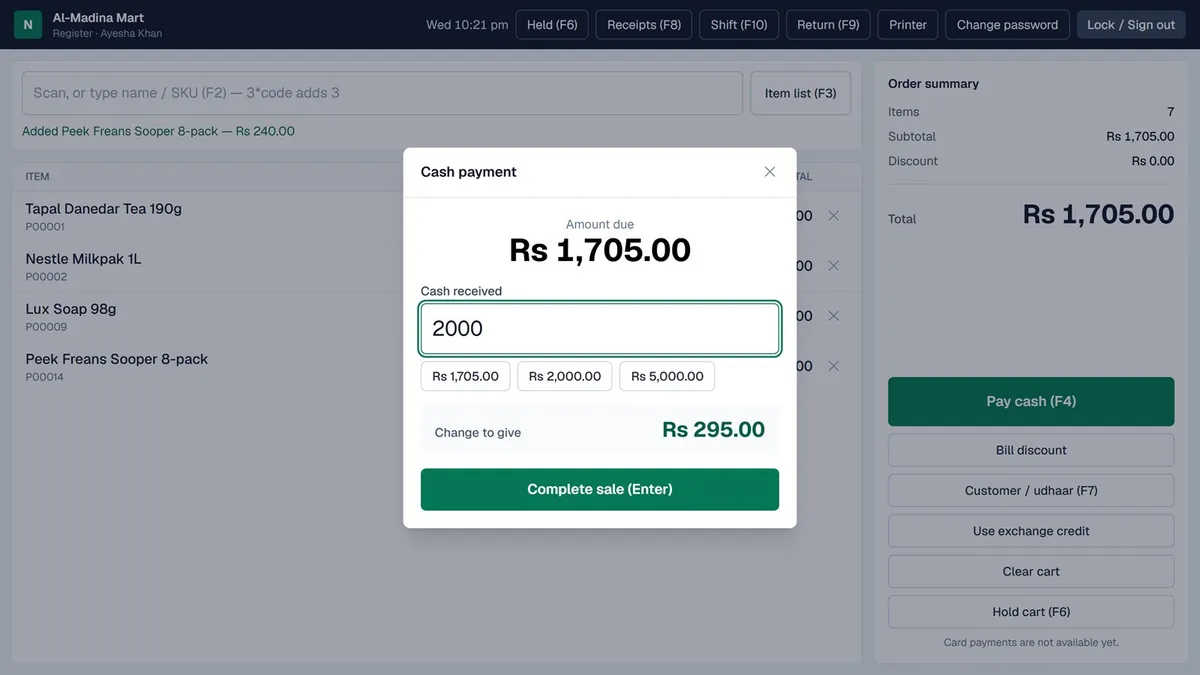
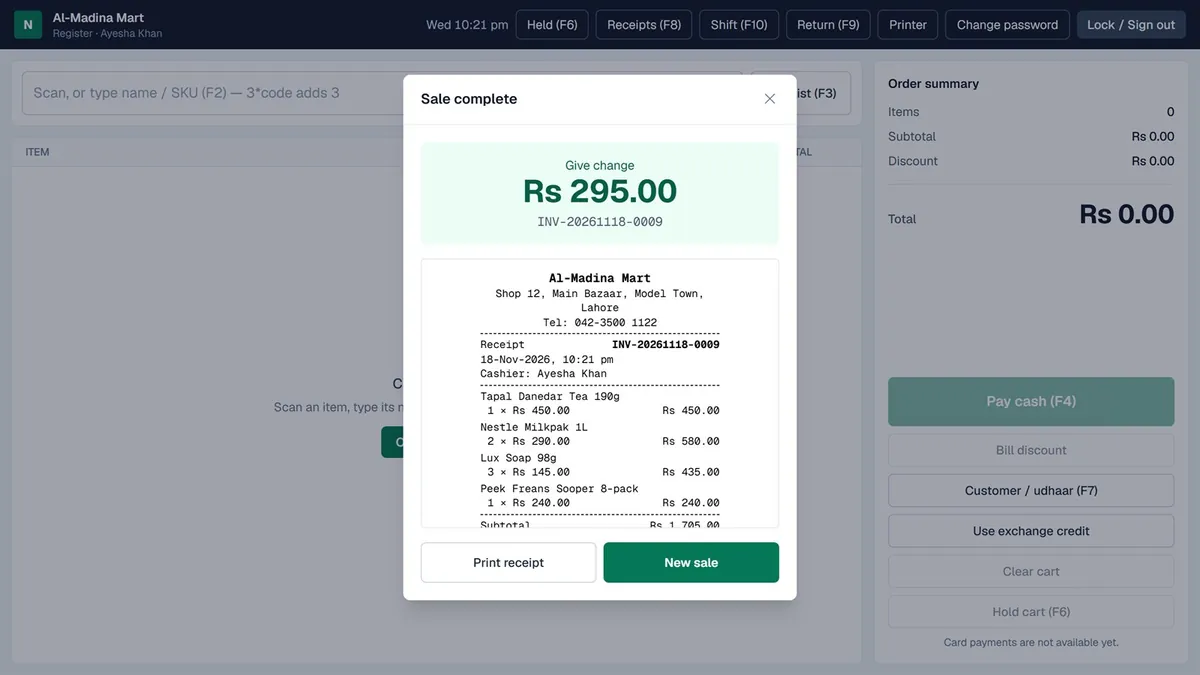
- F4 → enter the amount in Cash received (or use the quick buttons). The screen shows the change to give.
- Complete sale (Enter). Pressing Enter twice never makes two sales. If the network fails, press the same button again — the sale is not duplicated.
- Print receipt, then New sale. With direct printing on, the receipt prints by itself and the cash drawer opens (Chapter 7).
4.5 Customer credit (udhaar) — F7 Customer
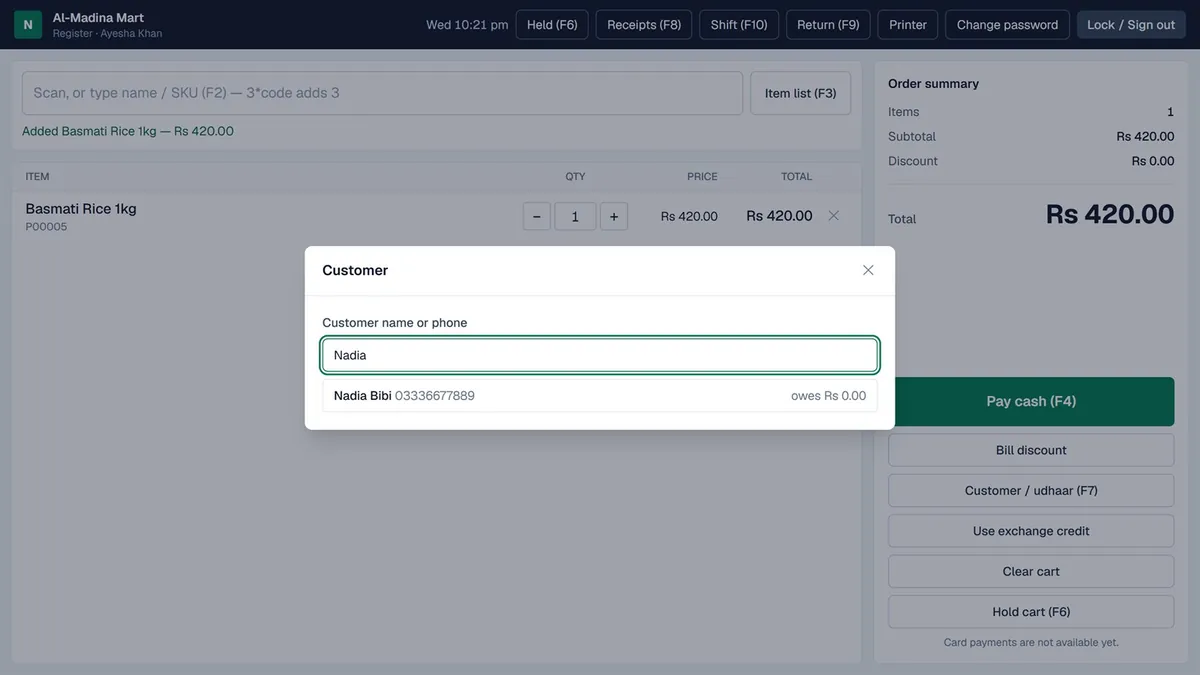
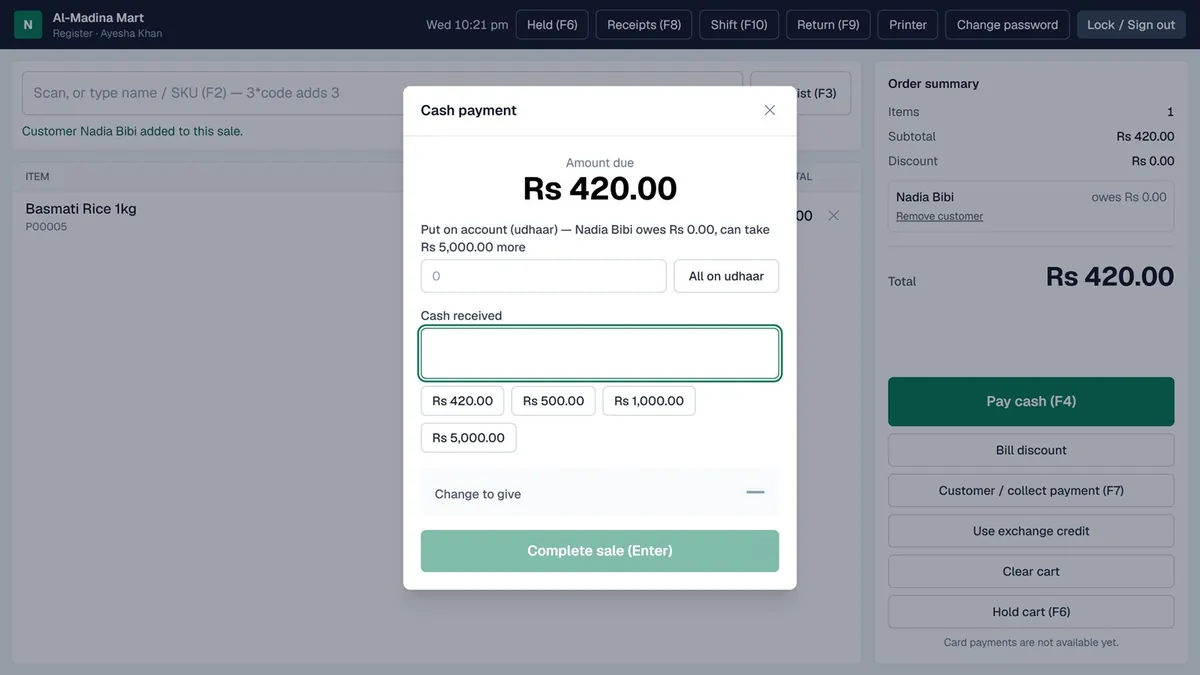
- F7 → search by name or phone → select.
- At F4 enter an amount in Put on account (udhaar), or All on udhaar. The customer's limit cannot be exceeded — the screen says so and the sale does not go through.
- Collecting a payment: F7 → customer → Customer / collect payment (F7) → amount → Record payment → print the PAYMENT RECEIVED slip.
4.6 Customer stepped away — F6 Hold cart
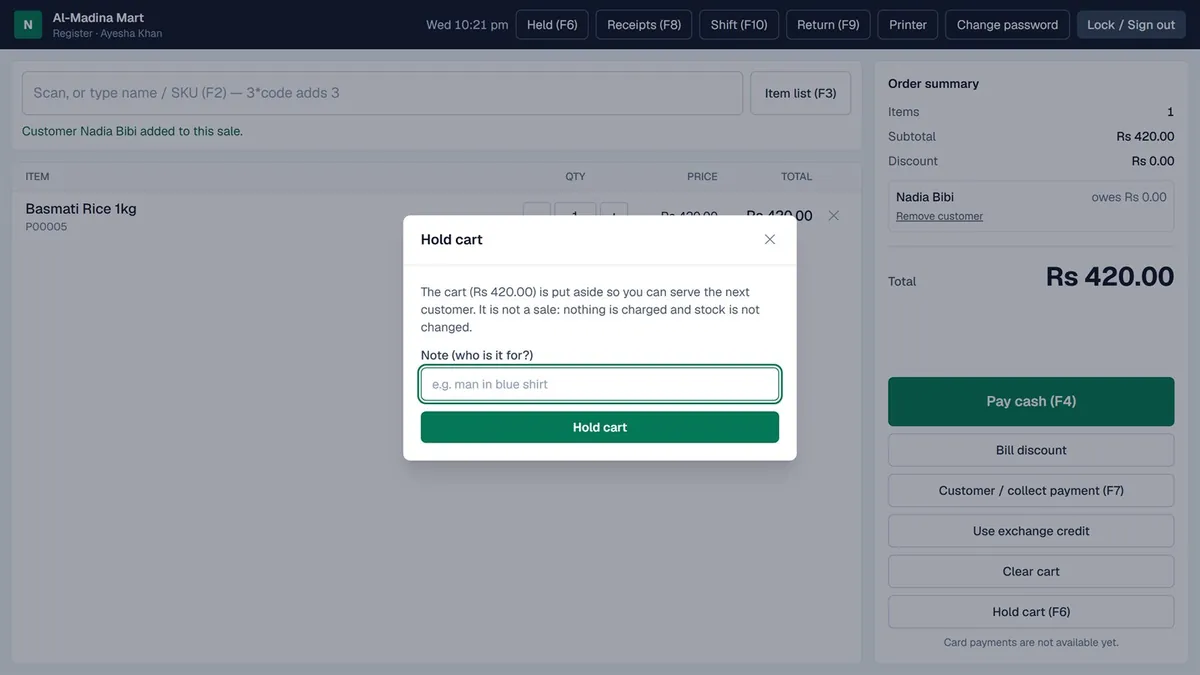
F6 → a note (such as “blue shirt”) → Hold cart. Serve the next customer. When they return, clear the cart and press F6 (or Held at the top) → Resume. A held cart is not a sale: no money taken, no stock moved. It survives a refresh, is available on any till, and prices are refreshed when resumed.
4.7 Old receipts, reprint and void — F8
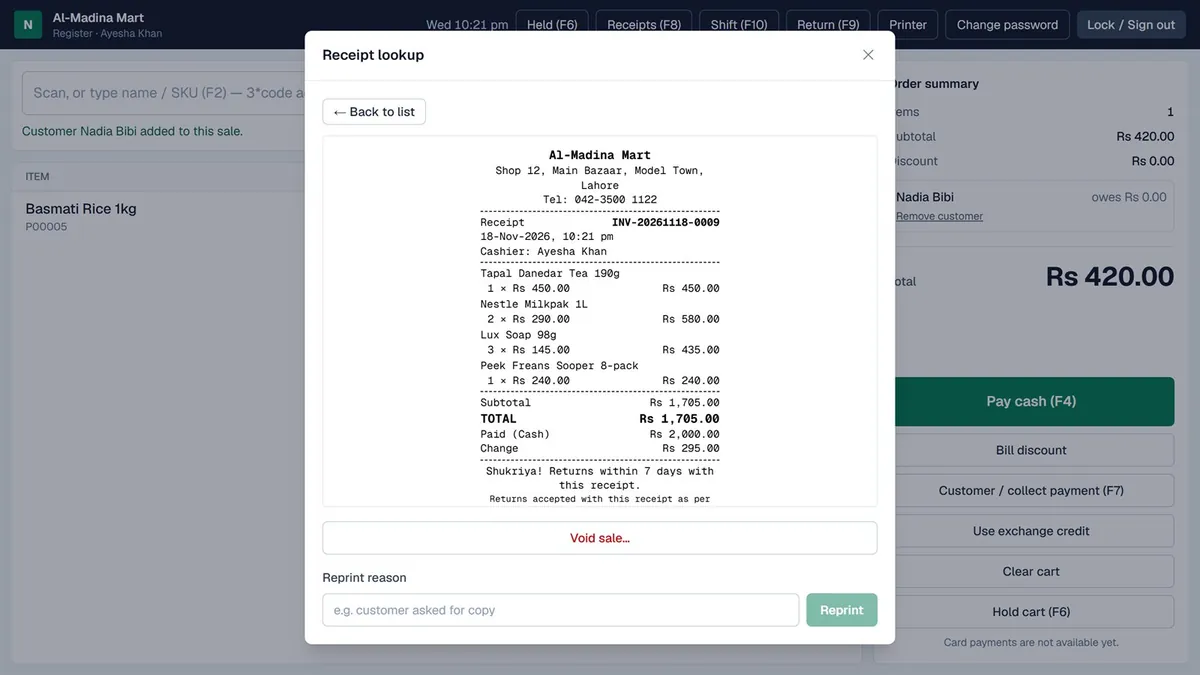
- Find a receipt by its number. To print it again: Reprint reason → Reprint — the copy says DUPLICATE / REPRINT. No new sale is made.
- Cancel a wrong sale (Void): open the receipt → Void sale… → reason. For a cashier, a manager types their own username and password there. Stock and money go back and the receipt shows VOID. Only sales from the shift that is still open can be voided; for older sales use a return (F9).
4.8 Returns and exchanges — F9
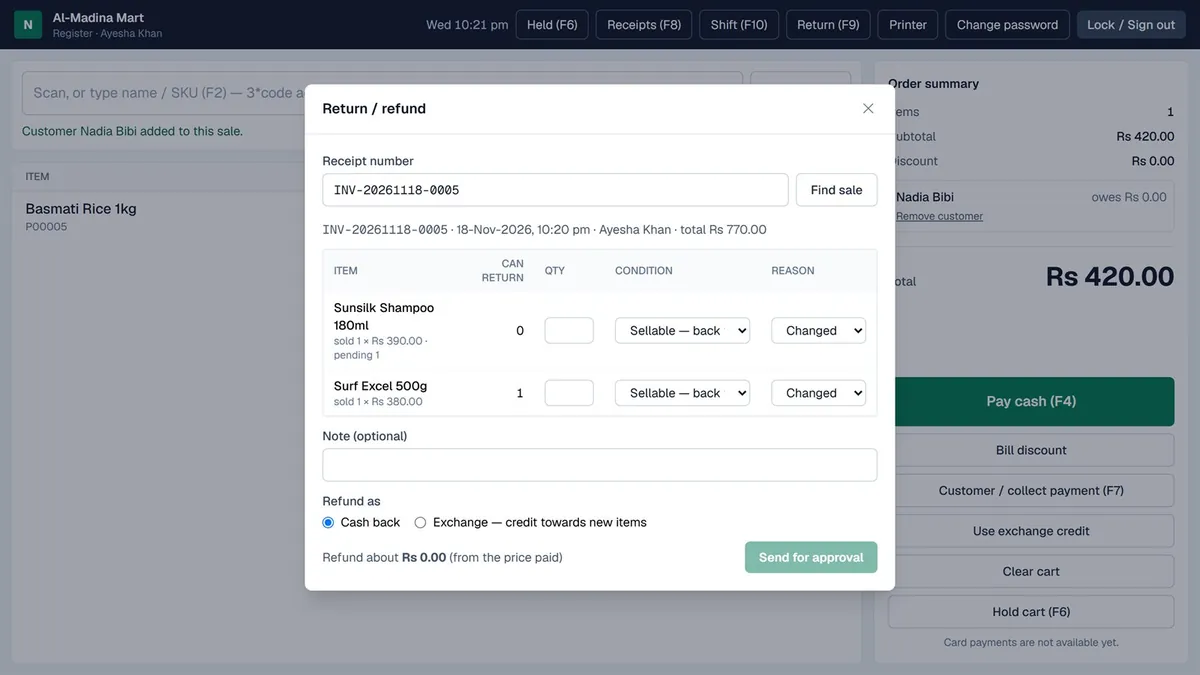
- F9 → receipt number → Find sale.
- Enter the quantity coming back. Condition: Sellable — back to shelf (returns to stock) or Damaged — no restock (does not). Choose a Reason.
- Refund as: Cash back or Exchange — credit towards new items.
- For a cashier the button is Send for approval — a manager or the owner approves it. A manager completes it straight away.
- Exchange: after approval, put the new items in the cart → Use exchange credit → the return number (
RET-…). Only the difference is paid or refunded. If the screen says do not give cash, don't.
Refunds are always at the price actually paid (after discounts), not today's price. A completed sale is never edited.
4.9 Shift — F10, and ending the day
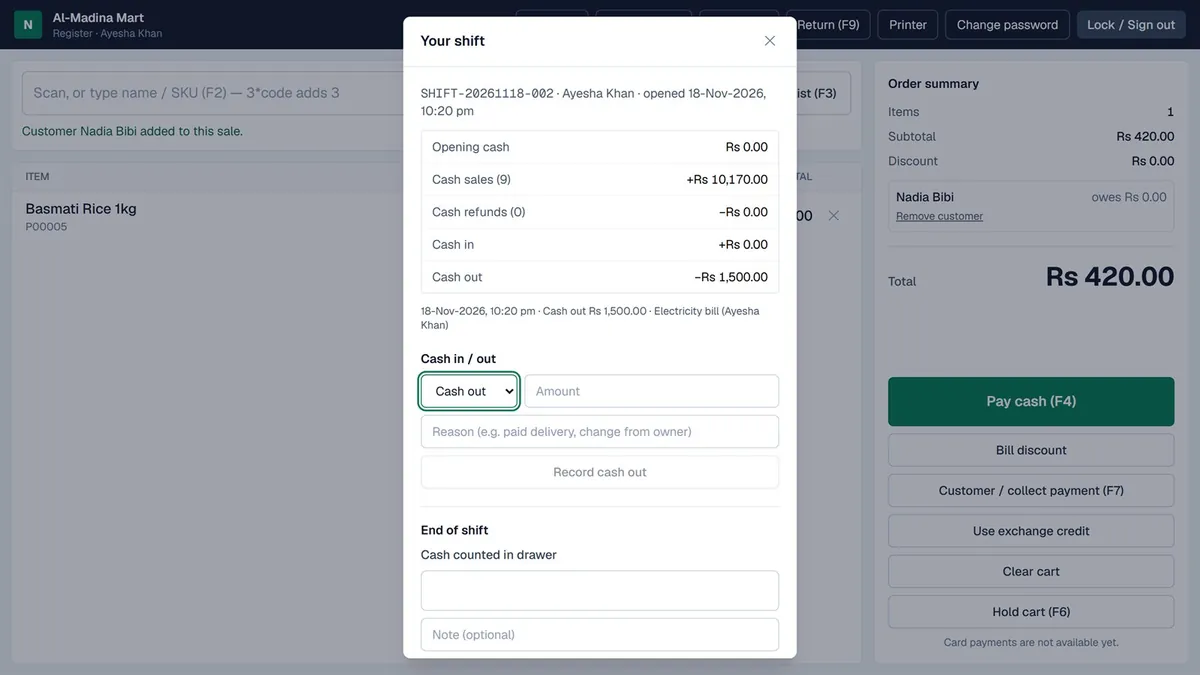
- Cash in / Cash out: money put into or taken from the drawer (such as paying a bill) — amount and reason.
- End of shift: count all the cash in the drawer and enter it → Close shift… → Yes, close shift. The cashier does not see the expected amount first — count first, then the difference is shown to the owner.
- Always Lock / Sign out when leaving the counter. After 15 minutes without activity the POS signs out by itself.
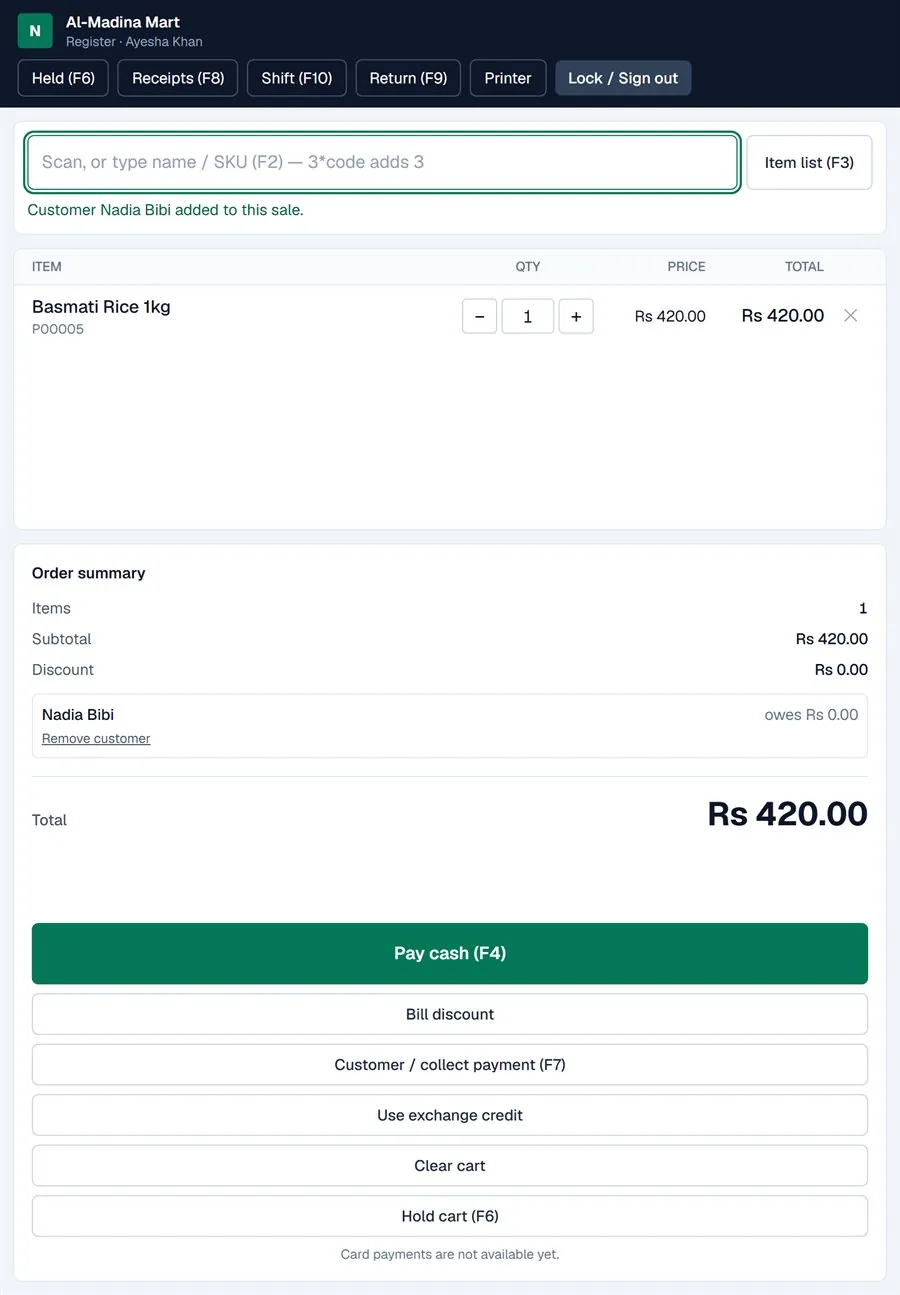
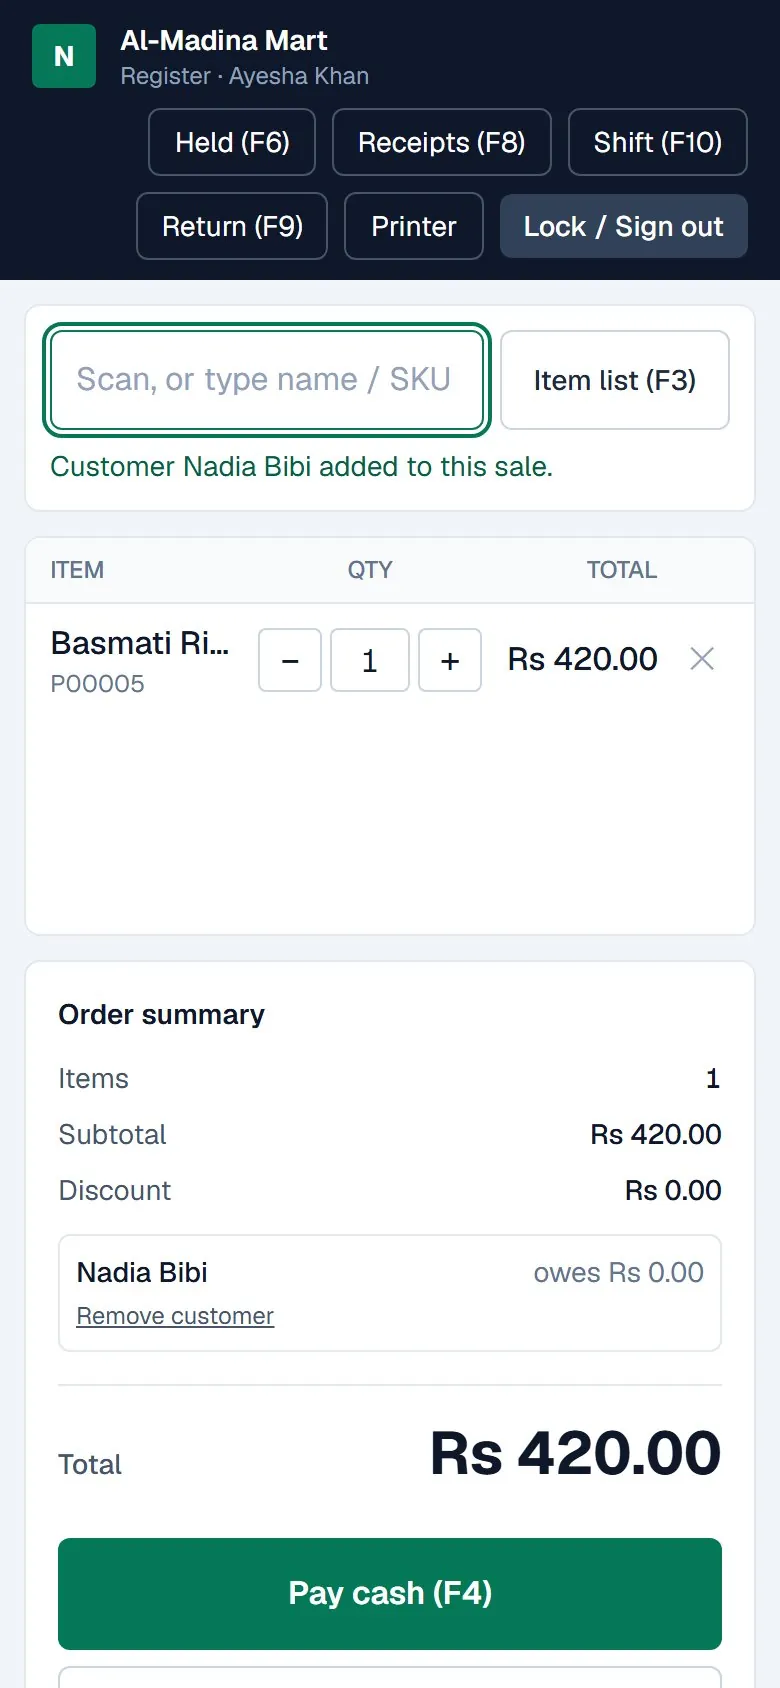
4.10 On a tablet or phone
Chapter 5
Keyboard shortcuts
Print this page and keep it at the counter.
| Key | Action |
|---|---|
| F2 | Search box — type a name or SKU |
| F3 | Item list (pick items without a scanner) |
| F4 | Pay cash |
| F6 | Hold the cart / bring back a held cart |
| F7 | Customer / udhaar / collect payment |
| F8 | Old receipts, reprint, void |
| F9 | Return / exchange |
| F10 | Shift: cash in/out, close shift |
| Esc | Close the open dialog |
| ↑ ↓ + Enter | Pick an item from the search list |
3*code | Add 3 at once (scan or type) |
Remember
- Start of day: Open shift (count the drawer). End of day: End of shift → count → Close shift.
- Same item scanned again = quantity +1.
- Discount: click the item's name, or Bill discount. Above your limit → a manager types their password.
- Sales can't be edited — wrong bill in the same shift: F8 → Void sale…; later: F9 return.
- Damaged goods returned: Damaged — no restock. Never give cash for exchange credit.
- Leaving the counter: Lock / Sign out. Never share your password.
- If the screen shows an Error ID, write it down or take a photo and give it to the owner.
Chapter 6
Owner app: daily, weekly and monthly work
Managers have everything except Staff, Settings, Audit Log and License.
6.1 Dashboard
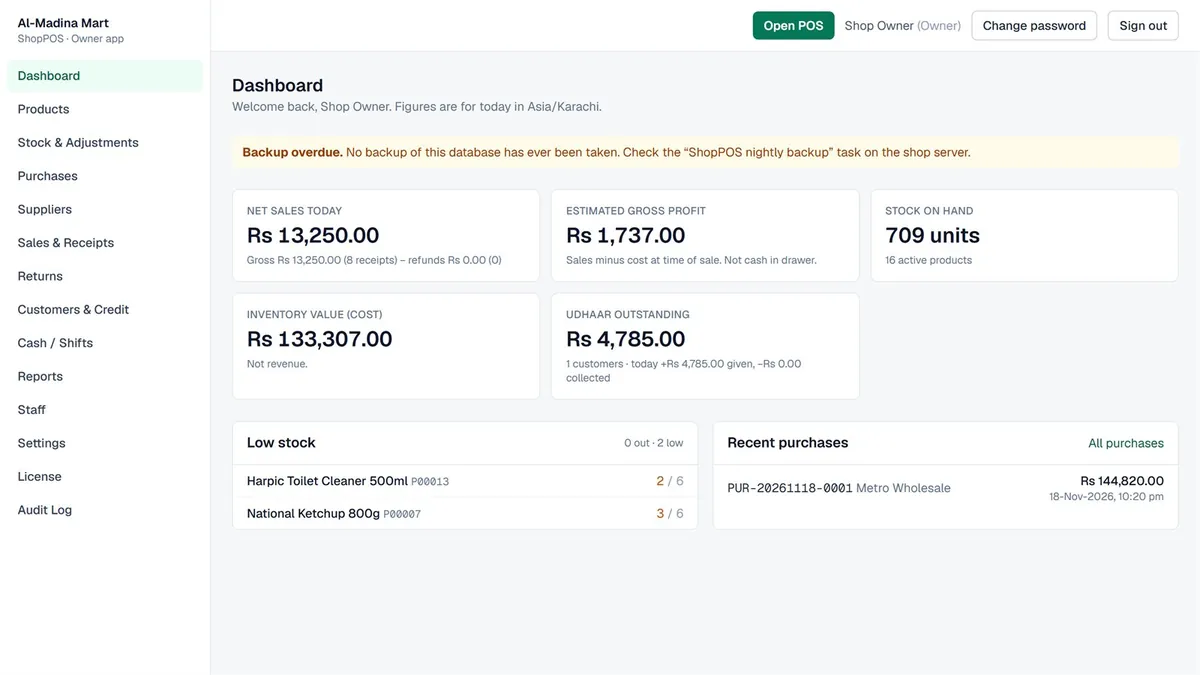
- Net sales today, Estimated gross profit (sales minus cost at the time of sale — not the cash in the drawer), Stock on hand, Inventory value (cost), Udhaar outstanding.
- Low stock: what to reorder. Recent purchases.
- The top shows Last backup …. A yellow Backup overdue warning means the backup needs attention (Chapter 9).
6.2 Daily routine
| When | Where | What to check or do |
|---|---|---|
| Morning | Dashboard | Yesterday's sales right? Backup done? Low stock. |
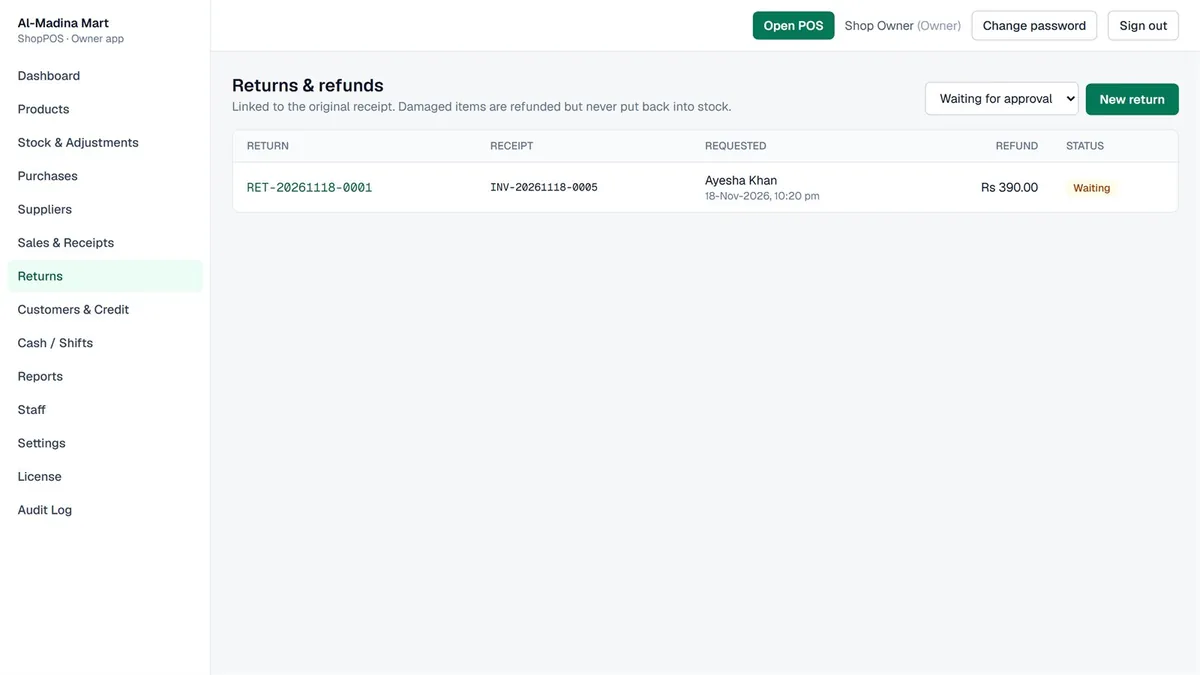
| During the day | Returns | Returns sent by cashiers → Approve (money or credit goes out) or Reject return (with a reason). |
| Goods arrive | Purchases | Quantities and costs as on the bill → Post. |
| Evening | Cash / Shifts | Every shift closed? How big is the difference between counted and expected, and why? |
6.3 Approving returns
6.4 Purchases: the list and fixing mistakes
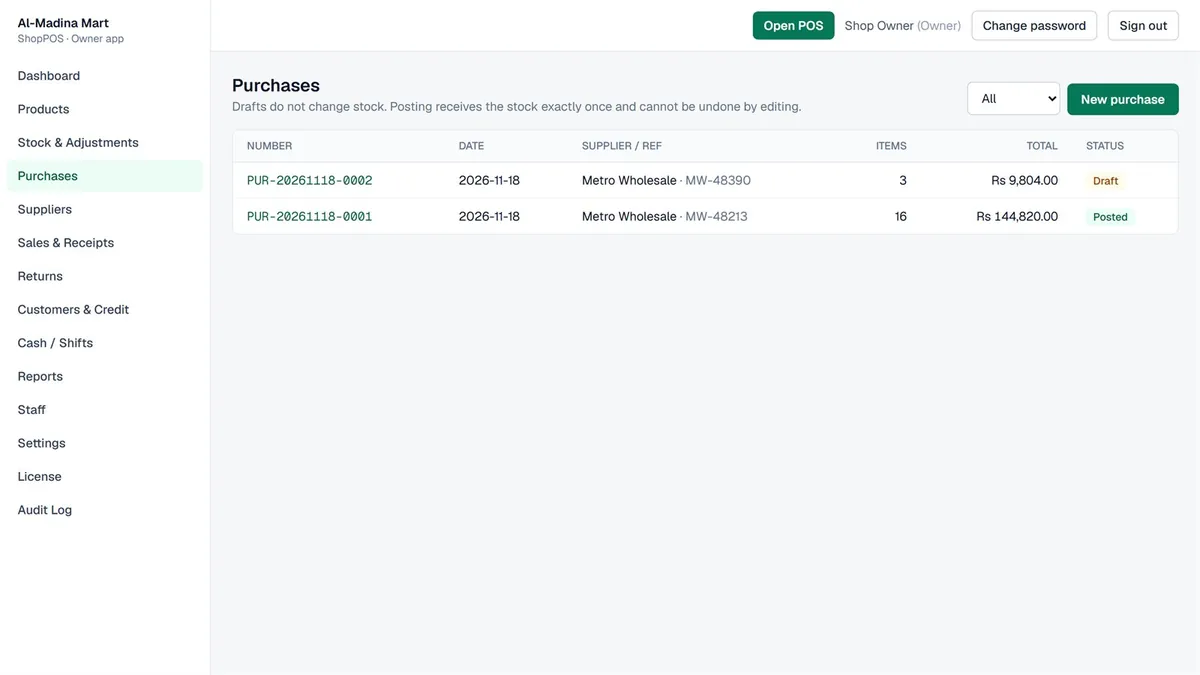
- A posted purchase is never edited (so the books stay clean). Instead:
- Correct…: the purchase is taken back out of stock (Reversed) and a new draft opens with the same lines — fix it and Post.
- Reverse…: only take it back out (entered twice, or goods returned to the supplier). A reason is required and goes to the Audit Log.
- If some of those goods were already sold, it cannot be reversed — fix the difference with Stock & Adjustments → Adjust.
6.5 Stock and counting
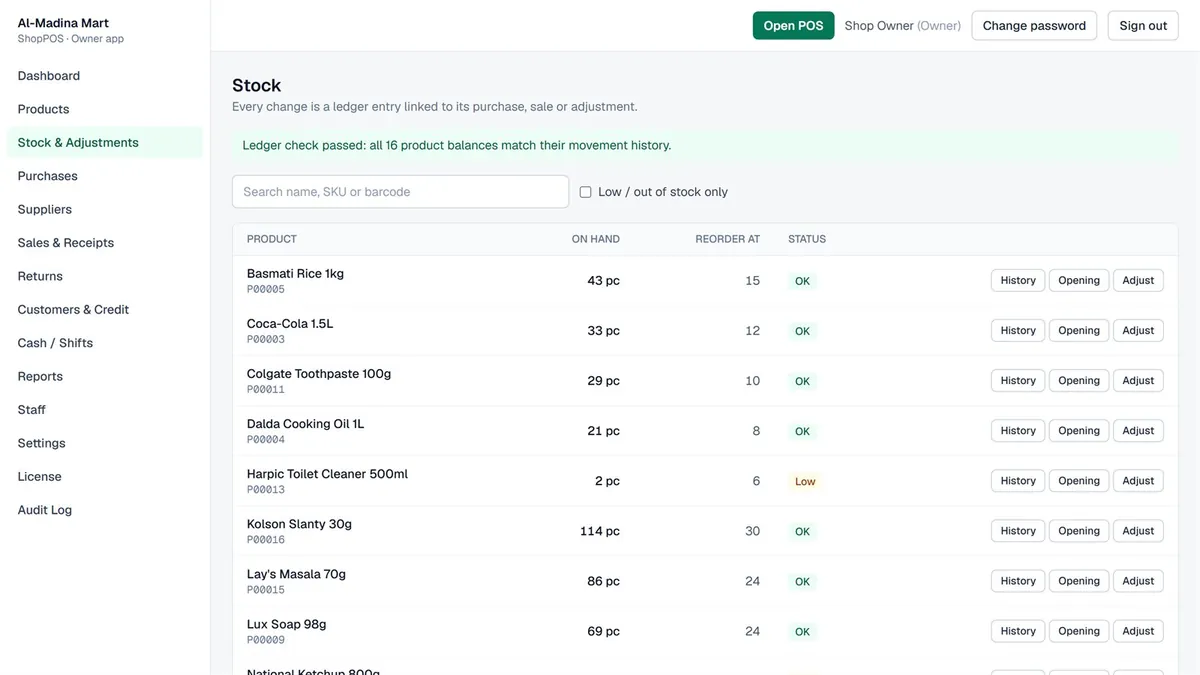
- History: every movement of a product (purchase, sale, return, adjustment), who made it and when.
- Counted the shelf and found a difference? Adjust — a reason is required and it goes to the Audit Log. Low / out of stock only filters the list.
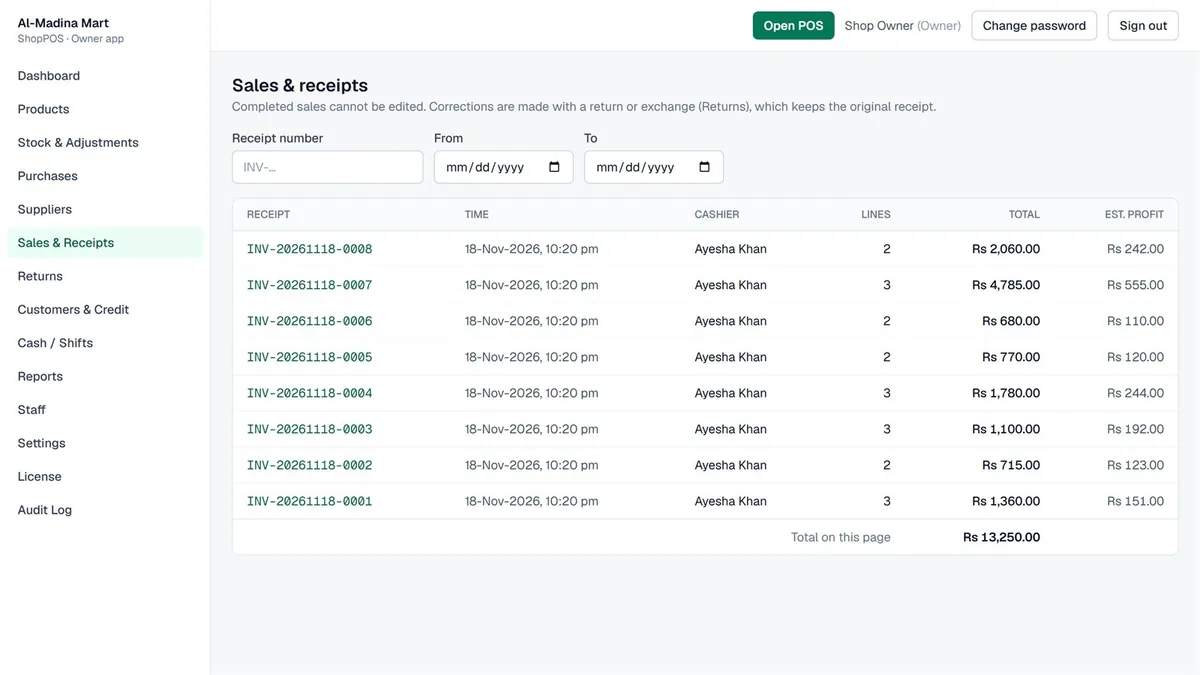
6.6 Sales and receipts
6.7 Udhaar: ledger and collections
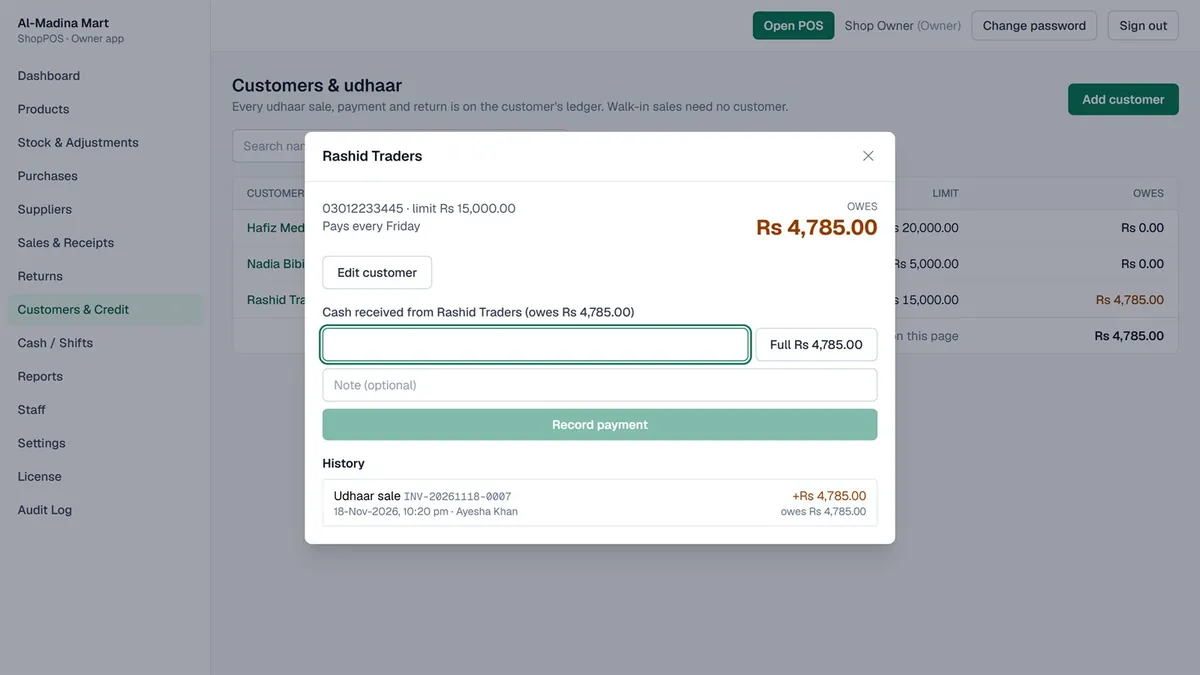
Only customers who owe shows just those with a balance. Change a customer's limit with Edit customer.
6.8 Cash / Shifts
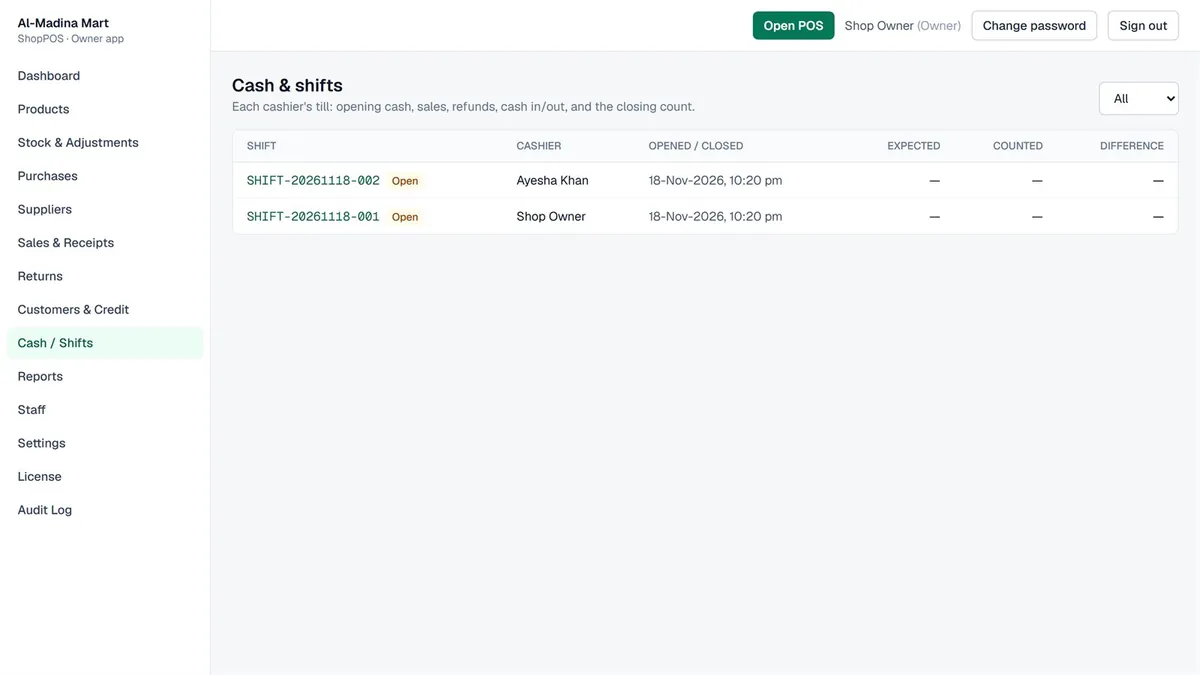
Open a shift to see every sale, refund, collection, cash in/out and the counted difference (Difference). Shifts left open for days are flagged.
6.9 Reports
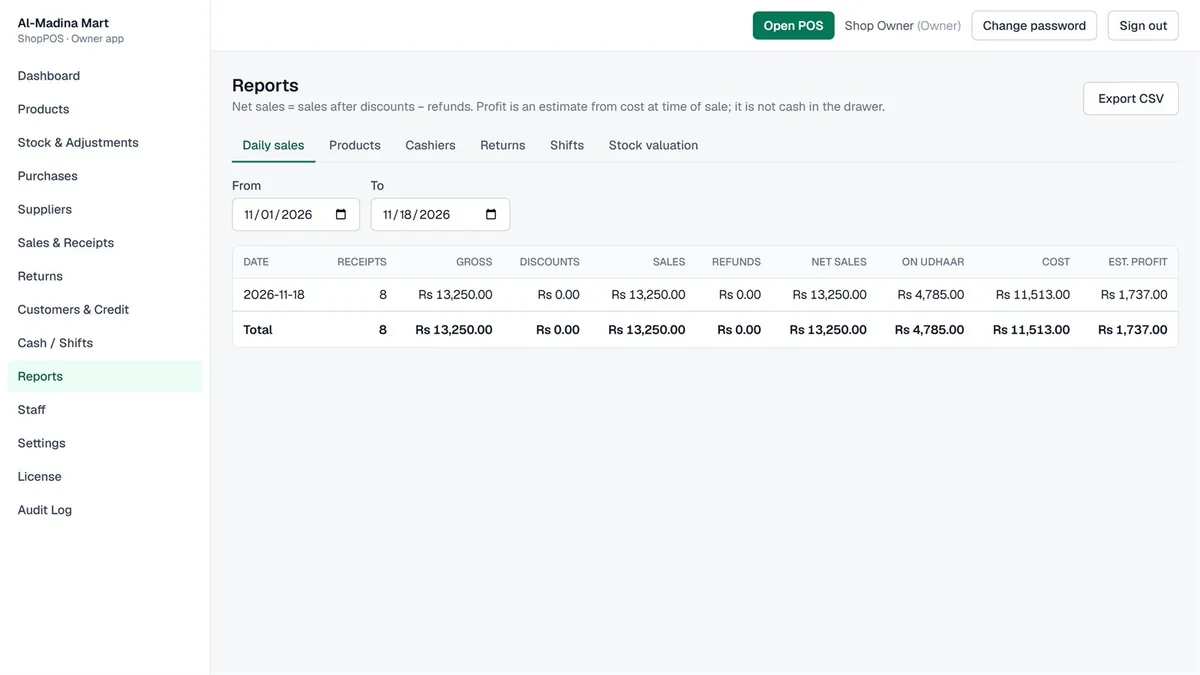
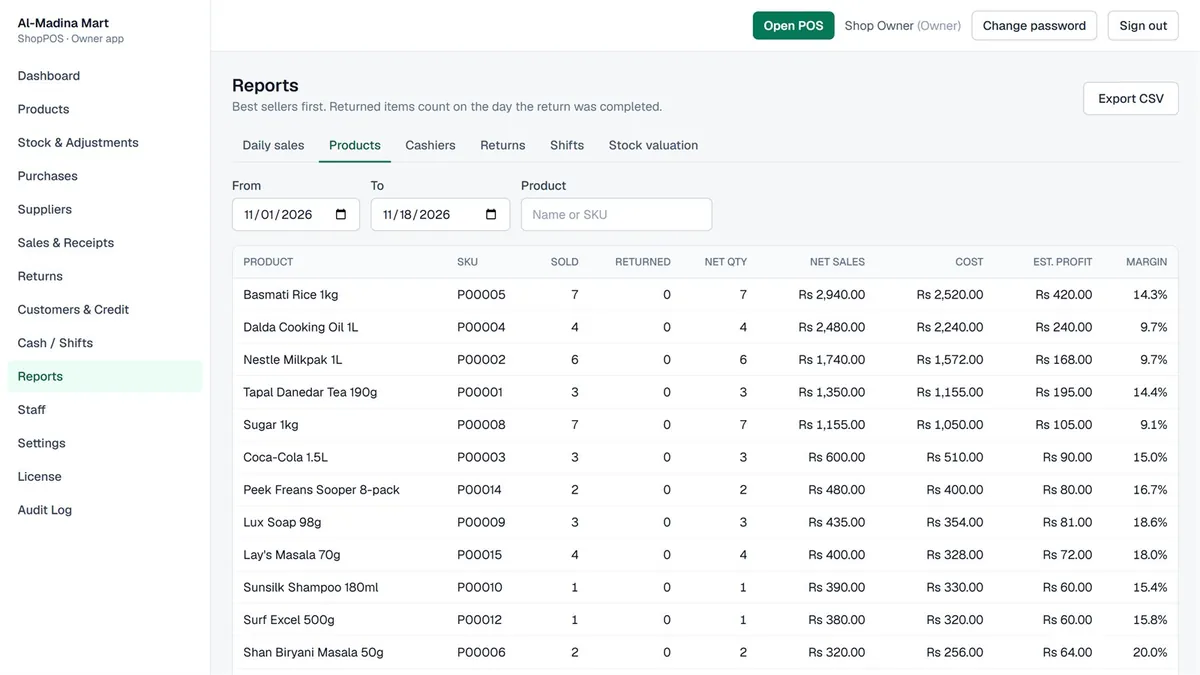
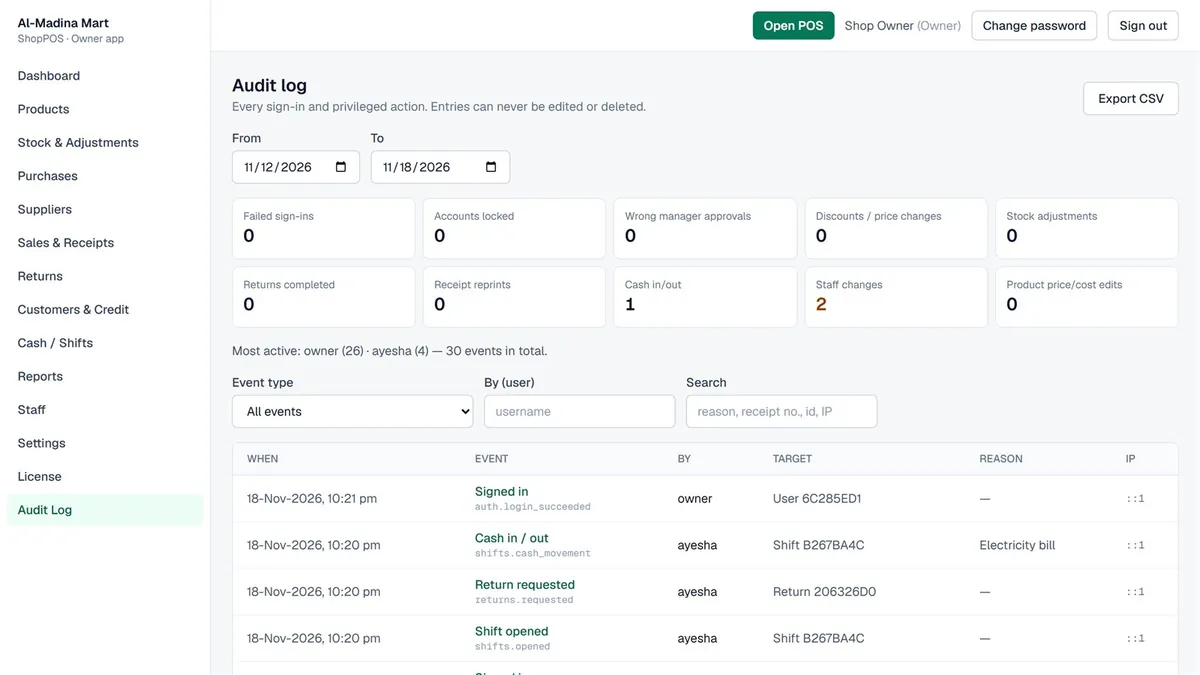
6.10 Audit Log (owner only)
6.11 Settings (owner only)
Chapter 7
Scanner, receipt printer and cash drawer
Everything works without hardware; connect it and it just works.
7.1 Barcode scanner
- Any USB scanner in keyboard (HID) mode — almost all ship that way. No driver needed.
- Whether the scanner sends Enter, Tab or nothing after the code, all work.
- Scans reach the cart even when the cursor is not in the search box — but not while a dialog is open; press Esc first.
- Wrong digits on scan? The scanner's keyboard language must match Windows (usually US English) — scan the “USA keyboard” code in the scanner's manual.
7.2 Two ways to print
| Browser printing (default) | Direct printing (Print Agent) | |
|---|---|---|
| Needs | Nothing | ShopPOS-PrintAgent-Setup.exe on that till PC (once) |
| Print window | Yes, confirm each time | No — prints straight away |
| Paper cut | If the Windows driver does it | Yes |
| Cash drawer | No | Yes, opens on cash sales |
| Printers | Any | ESC/POS: thermal printers · Windows driver: any (A4 too) |
7.3 Setting up direct printing (each till with a printer)
- Install the printer maker's Windows driver (Xprinter, Epson, Bixolon, Rongta…) and print a Windows test page.
- Run
ShopPOS-PrintAgent-Setup.exe. For ShopPOS address enter what this till opens in the browser, such ashttps://SHOP-PC:8443/. Only that address can print or open the drawer. - In ShopPOS: Printer → tick Print directly (no print window) → choose the printer → Receipt printer (ESC/POS) → tick Open the cash drawer on sales with cash and Print the receipt automatically after every sale → Print test page → Save.
- If Chrome asks to allow access to devices on your local network, click Allow.
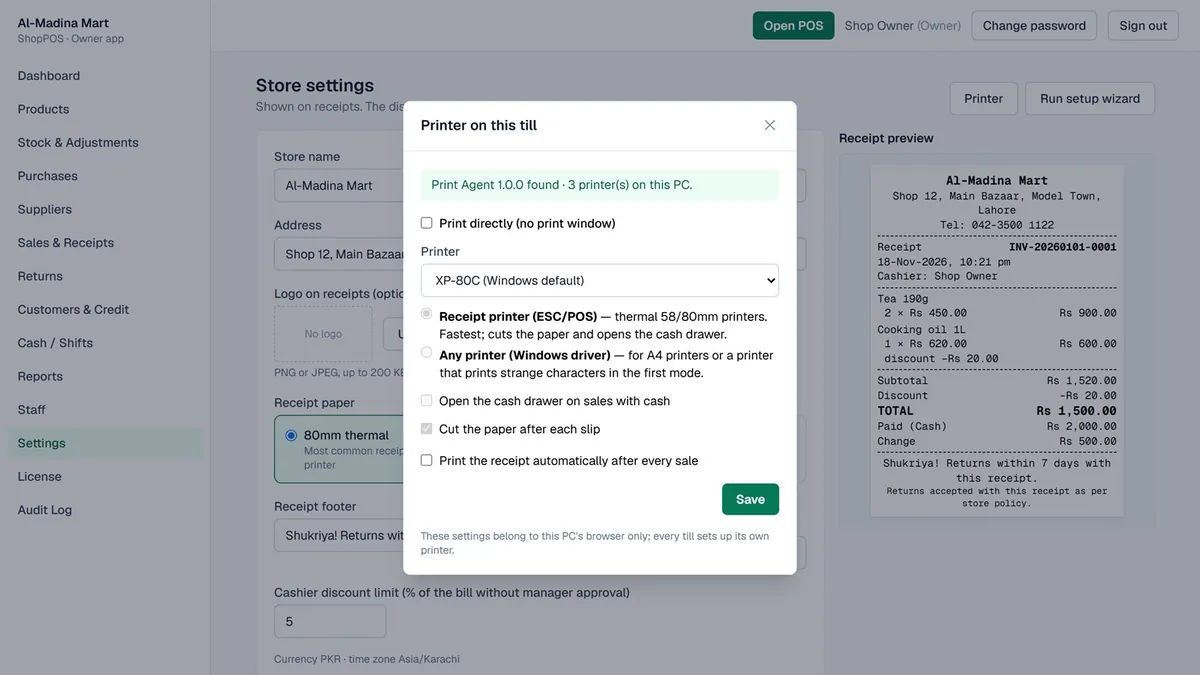
- The cash drawer's RJ11 cable goes into the receipt printer's “DK” / drawer port, not the PC. Reprints do not open the drawer.
- What prints: sale receipts (including DUPLICATE / REPRINT and VOID), return/exchange slips and udhaar payment slips. The logo prints at the top in black and white.
- Printer off or out of paper: the screen says why and the slip prints through the browser instead — the sale is never stuck.
7.4 Checks when the hardware arrives
| # | Test | Expected |
|---|---|---|
| H1 | Scan 10 different items quickly, then one of them again | 10 lines, the repeated item has quantity 2 |
| H2 | Click the Pay button (don't pay), then scan | Item still added to the cart |
| H4 | Printer → Print test page | Prints fully, edges not cut off, paper cut |
| H5 | Cash sale (auto print + drawer ticked) | Receipt at once, drawer opens, no print window |
| H6 | Udhaar-only sale | Receipt prints, drawer stays shut |
| H8 | Switch the printer off, make a sale | Message on screen, browser print window appears |
| H11 | Restart the till PC, make a sale | Direct printing works without doing anything |
Chapter 8
License and free trial
The license belongs to the shop's server PC; tills need nothing.
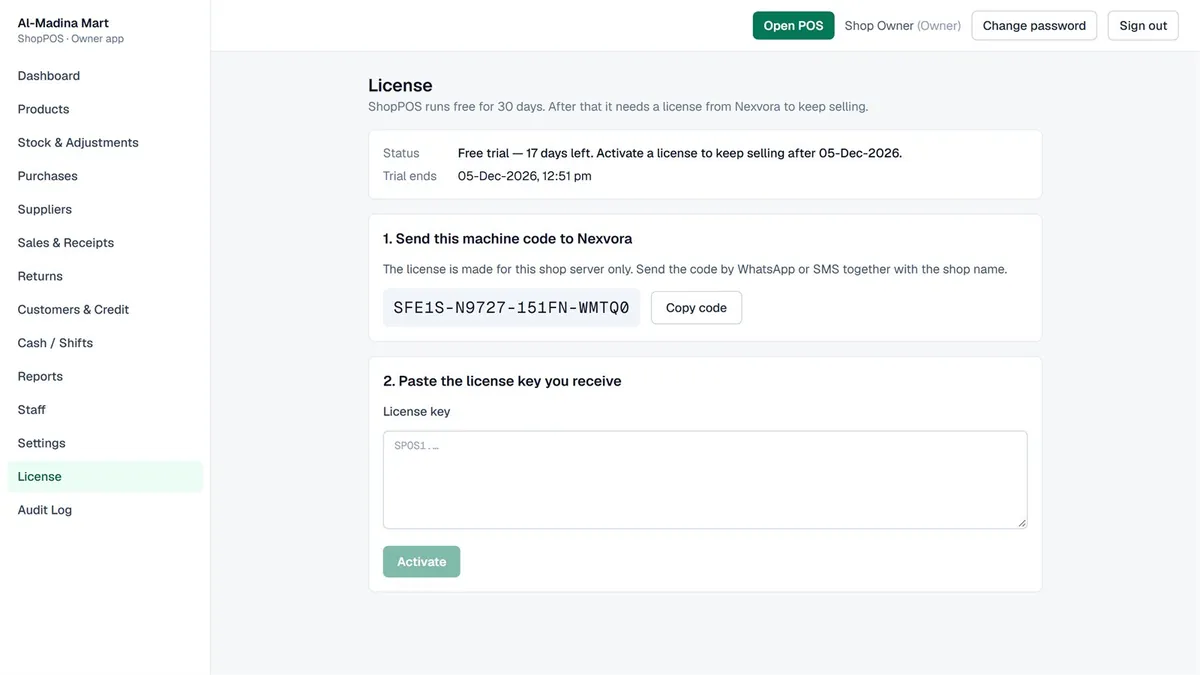
- Trial: a new installation runs fully for 30 days. In the last 7 days a yellow strip appears.
- After the trial (or when a dated license ends) ShopPOS becomes read-only: signing in, viewing everything, reports and CSV export still work, but no new sales, purchases, returns, stock changes or settings. A red strip explains why. Your data is never locked away or deleted.
Activating
- Owner app → License → Copy code (the machine code, such as
SFE1S-N9727-151FN-WMTQ0) → send it with your shop name to support@nexvorasoft.com. - Nexvora sends back a license key (
SPOS1.…). - Paste it into License key on the same page → Activate. It applies to every till immediately.
Chapter 9
Backups, updates and restore
Mostly automatic; the owner only needs to keep an eye on it.
Backups
- A full backup every night at 23:30 to
C:\ShopPosBackups— or as soon as the PC is next on if it was off. Each backup file is verified. - Backups older than 30 days are removed, but the newest 7 are always kept.
- On the 1st of every month a restore drill restores the latest backup into a separate database and checks the stock and udhaar totals. The result goes to
restore-drill-log.txt(it should say OK). - Backup overdue on the dashboard means no backup in 26 hours — tell your technician.
Updates
- After closing time, run the new
ShopPOS-Setup-x.y.z.exeon the server — it asks no questions. - It backs up the database first, keeps the old program, installs the new one, and the database upgrades itself.
- If the new version does not start properly, the old program and database come back automatically. Tills pause for a minute or two.
Restore (serious problems)
If data must be brought back, talk to your technician first. Before a restore the current database is backed up too (a “safety backup”), so choosing the wrong file can be undone. Sales made after the backup must be re-entered from receipts.
Uninstalling
The service, scheduled tasks and program are removed, but the database (including the license), the backups and the trial date are kept.
Chapter 10
Rules the system enforces
They keep the books clean and trustworthy.
Sales are never edited or deleted
Mistakes are fixed by a void (same shift) or a return/exchange. Purchases are not changed after posting either — use Correct or Reverse.
History doesn't change
Changing a price or cost does not change old receipts or past profit.
Stock never goes negative
A sale stops when stock is short and shows how much is left.
Return limits
No more than was sold can come back; damaged goods don't return to stock; refunds use the price actually paid (after discounts).
Cashiers don't see costs
Cost, profit and other people's sales are for the owner and managers. Cashiers see only their own shift and sales.
Credit limits
A sale that would take a customer over their limit does not go through.
Discount limits
Discounts above the limit need a manager's or the owner's own password; every discount is in the Audit Log.
Nothing is doubled
Pressing Pay or Post twice, or resending after a network failure, never creates a sale or stock twice.
Chapter 11
Troubleshooting
On-screen messages and what to do.
| On screen / problem | What to do |
|---|---|
Product not found | Scan again or search by name. Still not found? Tell the owner (the product hasn't been added). |
Not enough stock | Sell only the quantity left; tell the owner (a purchase wasn't posted, or the count is off). |
No open shift | Open shift. |
| “Your session ended” | Sign in again — ShopPOS returns you to the same screen. (Your password was changed or your account disabled.) |
| “Cannot reach the server” / “did not answer in time” | Check the network and the server PC, then press the same button again — the sale won't be doubled. |
Error ID: E-… | Write down the code or take a photo for the owner or technician. Full details are in C:\ShopPos\logs\errors-*.log on the server. |
| Till shows “Your connection is not private” | The certificate isn't installed on that till (Chapter 2), or the address isn't the server's name/IP. |
| Tills can't open the site at all | Server on? Same network? Windows network set to Private? On the server, does http://localhost/health say Healthy? |
| Red strip: read-only | Trial or license ended — Chapter 8. Your data is safe. |
| “The ShopPOS Print Agent is not running” | Run the Print Agent setup, or start ShopPOS Print Agent in services.msc. |
| Address error when printing (403) | The till opens ShopPOS at an address the Print Agent wasn't given — run its setup again with that address. |
| Strange characters or nothing printed in ESC/POS mode | The printer doesn't understand ESC/POS — choose Any printer (Windows driver). |
| Drawer doesn't open | Is the drawer cable in the printer's DK port? Try Print test page with the drawer option ticked. |
| Cash drawer doesn't match | Cash / Shifts → open the shift → every sale, refund, collection and cash in/out. |
| Owner's password forgotten | The owner's password can't be reset from the Staff page (only cashiers and managers can). Contact support@nexvorasoft.com. |
Chapter 12
Pricing and contact
One shop, one license. No limit on tills or staff.
Lifetime license
Every feature, installation and staff training included. Optional support PKR 10,000/year from year 2.
Yearly license
Every feature, support and updates included. Renew each year.
Extra till setup
An extra counter PC connected and tested — scanner, printer and drawer included.
Start with a 30-day free trial with every feature. When you activate a license, all trial data stays. Pay by bank transfer — no card needed.
Nexvora ShopPOS · by NexvoraSoft
Installation, training, licenses or any help: support@nexvorasoft.com · nexvorasoft.com
When asking for a license, include the machine code from the License page and your shop name.